With the increase in cyber threats, many iOS users have begun planning to build a security barrier via a VPN, but have no idea where to start.
No worry, we will guide you on how to set up a VPN on iOS with detailed steps and clean screenshots. Do not miss our blog!

Table of Contents
Why Do You Need a VPN on Your iPhone or iPad?
To figure out why we should use a VPN on iOS devices, let’s learn the major benefits of VPNs.
・Create Extra Layer of Security: VPN encryption provides an extra shield to your surfing data, making it impossible for third parties to crack and read.
・Keep Surf Anonymity: VPNs mask your real IP address and disguise data as regular traffic, giving you an online “cloak of invisibility”.
・Maintain Public Wi-Fi Security: Using public Wi-Fi can bring big risks, but a VPN prevents hackers from stealing your info via advanced security features.
・Bypass Geo-Restrictions: Since a VPN can change your IP, you can browse restricted websites or content from anywhere or achieve goals like buying YouTube Premium or Netflix Plan at the lowest price, unblocking the Netflix library, etc.
In a word, using a VPN on iOS can effectively safeguard your online privacy and security, while maximizing your surfing experience with various VPN features.
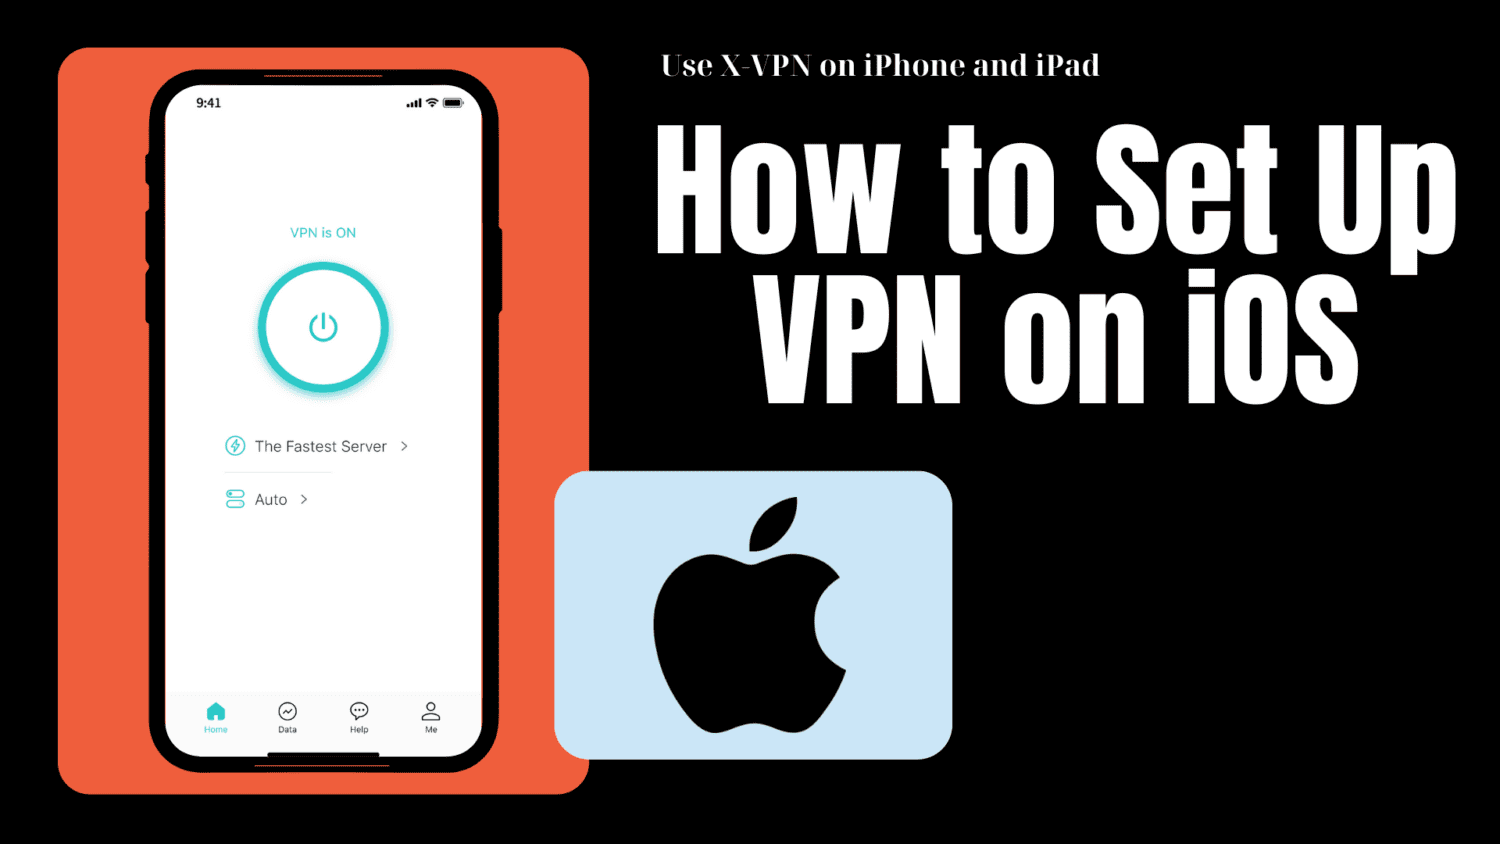
Detailed Guides on How to Set Up a VPN on iPhone/iPad
In the tutorial below, we’ll use the X-VPN app on iPhone to demonstrate the auto process first. Only one minute or two is needed, this top-notch provider will have you enjoying a standout VPN service.
Note
The VPN settings on iPhone are the same as on iPad.
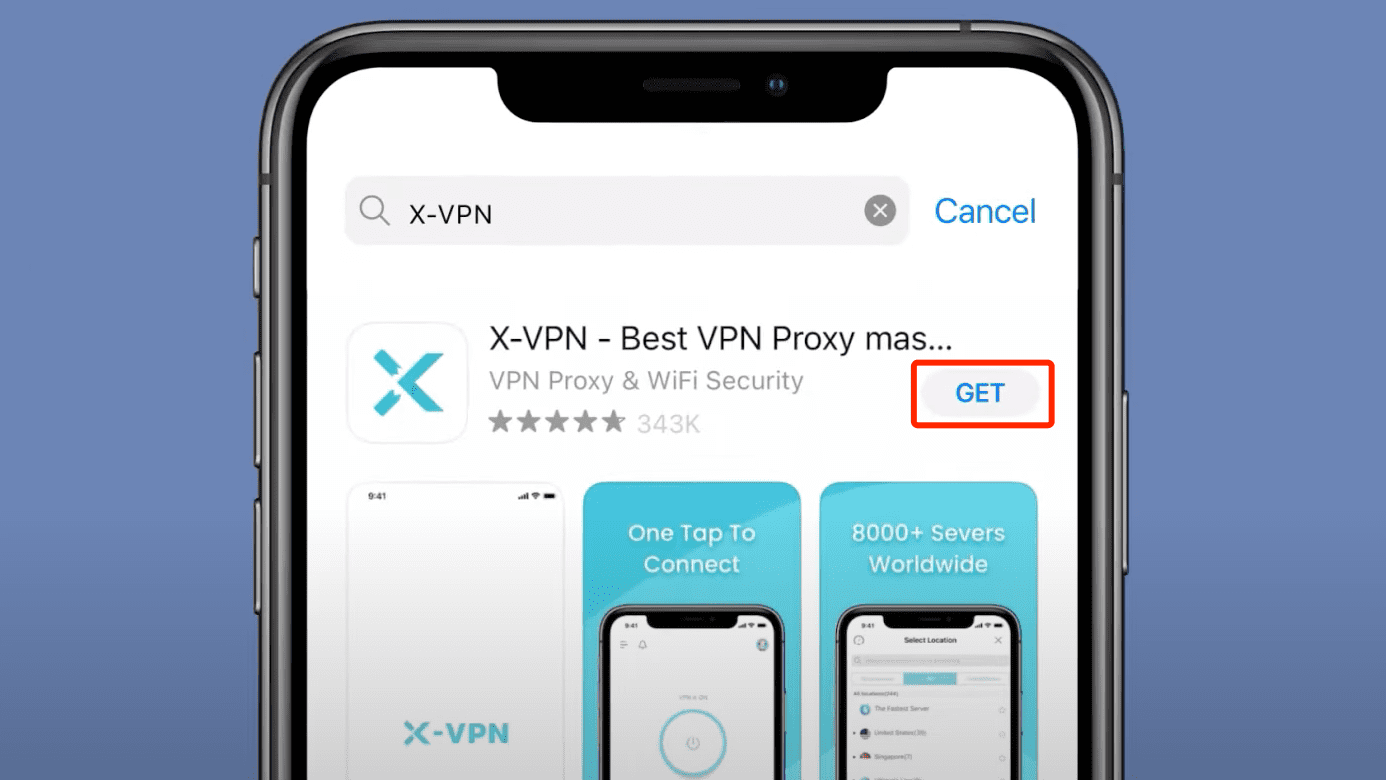
Download and Install X-VPN
・Hit the button below to get a VPN download from App Store on iPhone/iPad.
・Free Version ・8000+ Servers ・Fast Speed
Enter X-VPN App
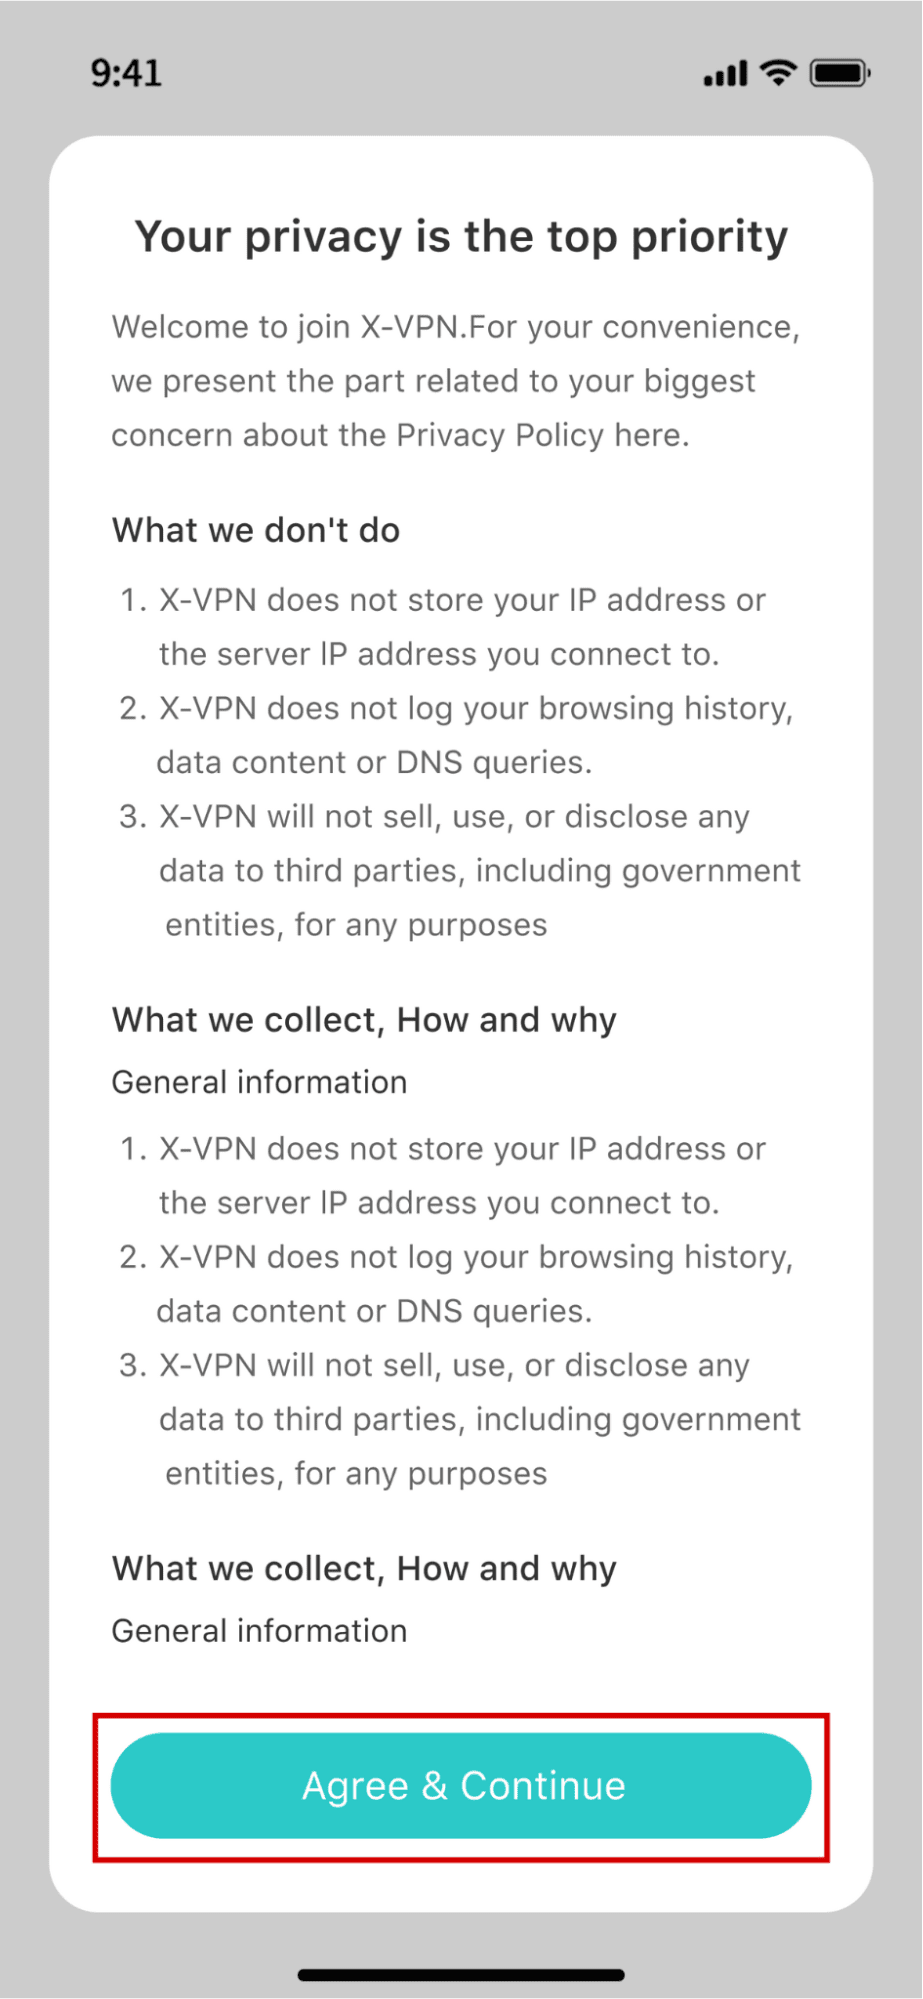
Step 1. After installation, launch X-VPN, and you will see our privacy policy. Hit the button to continue.
Step 2. When you first log in to X-VPN, a VPN Configurations prompt will pop up – press the Allow option.
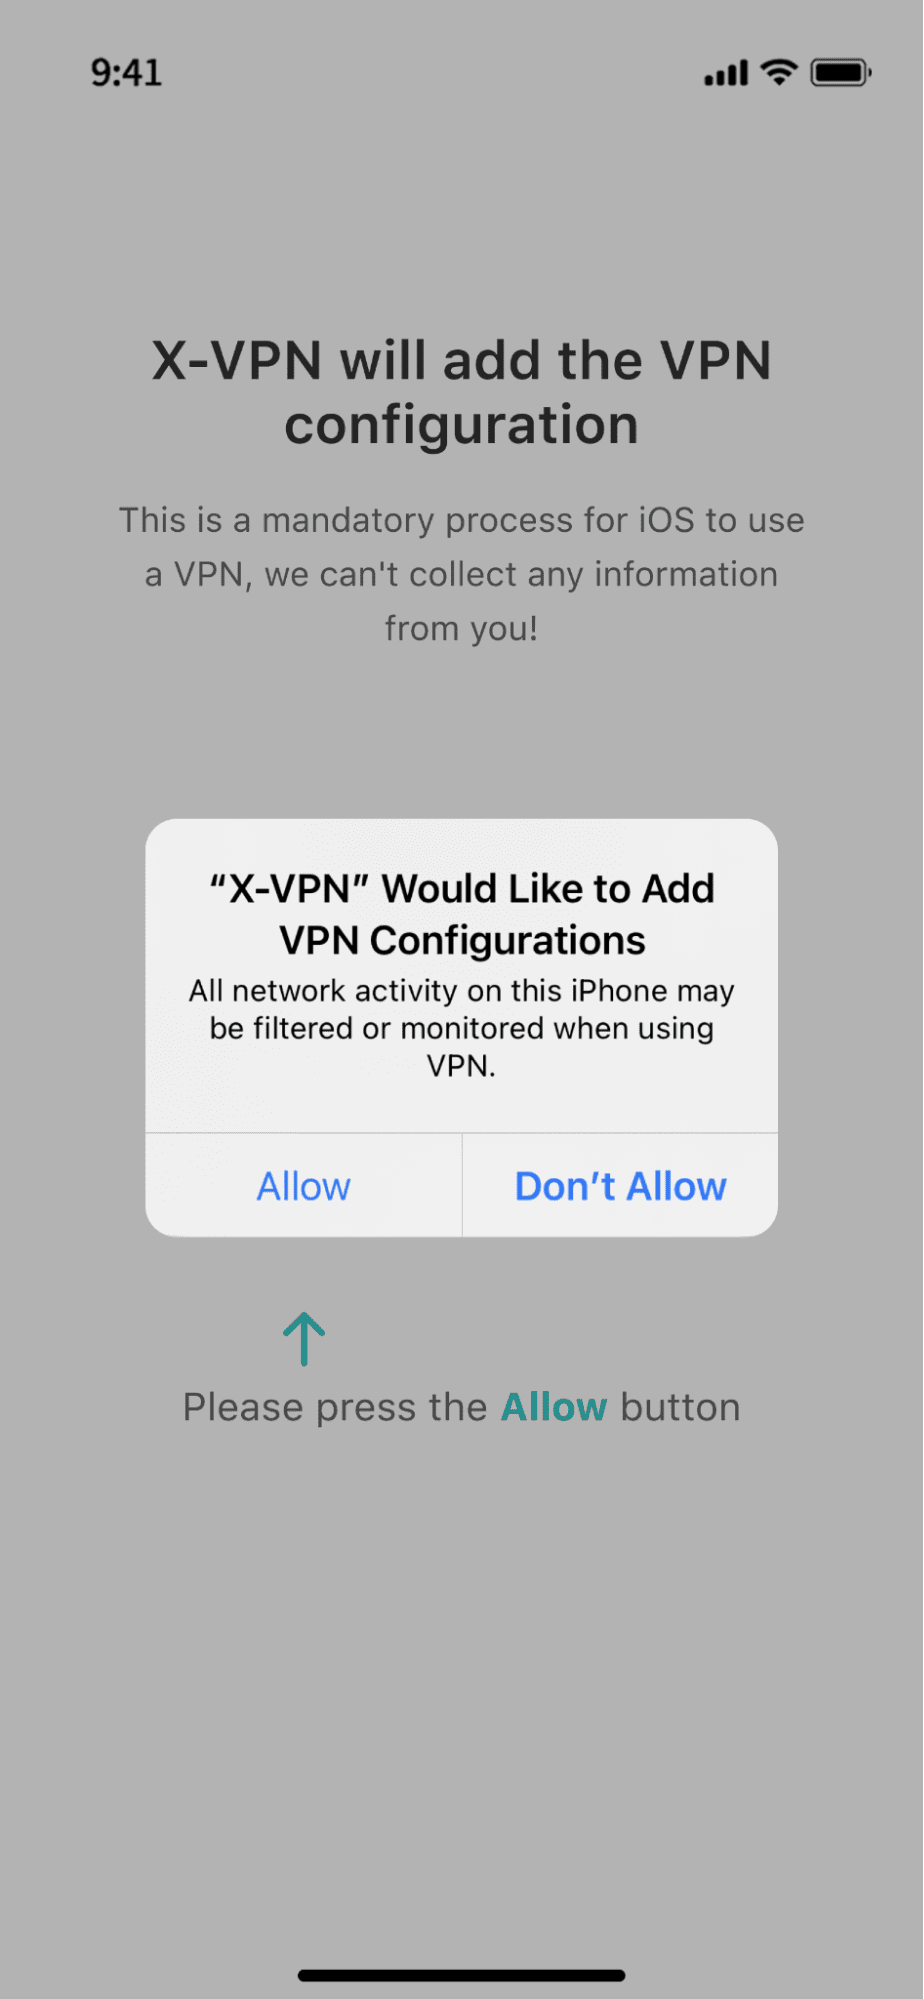
VPN Configuration is a VPN security feature, as it’s critical to securely connect to VPN servers.
Step 3. Now you’ll officially enter on X-VPN.
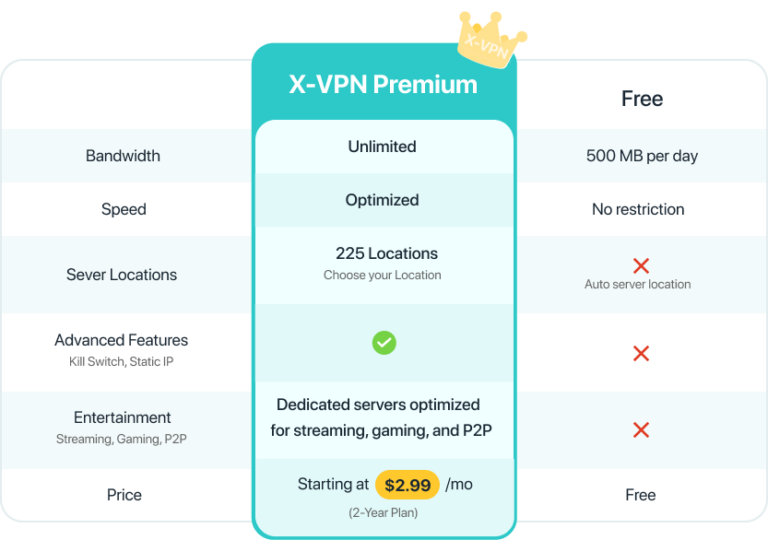
・X-VPN offers both a free version and paid plan. The differences are shown below.
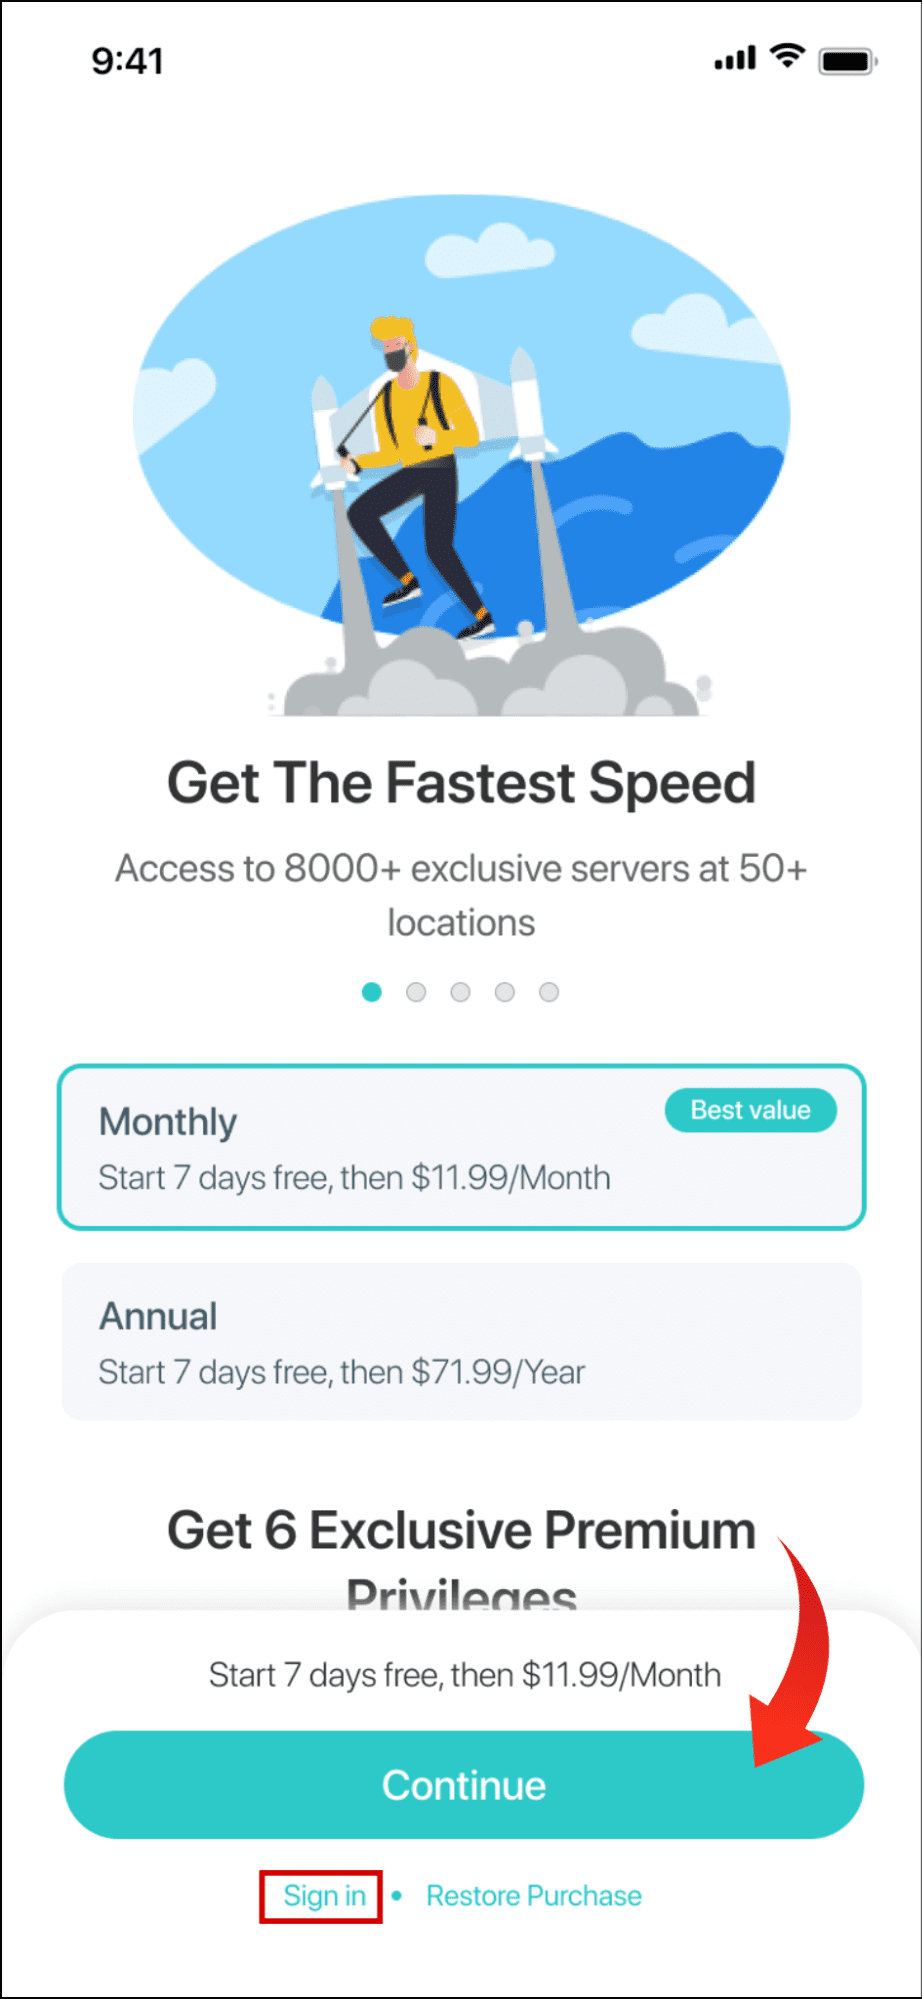
For Premium Users:
・If you already have an X-VPN subscription, hit the Sign in option at the bottom of the screen to enter the app via your premium account or restore the purchase on your devices.
・If not, you can select a premium plan that suits you and click Continue.
・If you are an in-app subscriber, you will enjoy a 7-day free trial. However, we prefer that you register and pay via the web, which will entitle you to a 30-day refund policy. During this longer trial period, if you are not satisfied with our service, you can request a refund at any time.
・Click the button below to get X-VPN Premium now and enjoy the lowest price of only $2.99/mo.
・Start at Only $2.99/mo ・Enjoy a 30-day Refund Policy
For Free Users:
・To use X-VPN for free, slide the page to the last one, and tap the USE WITH ADS button to enter the app without login.
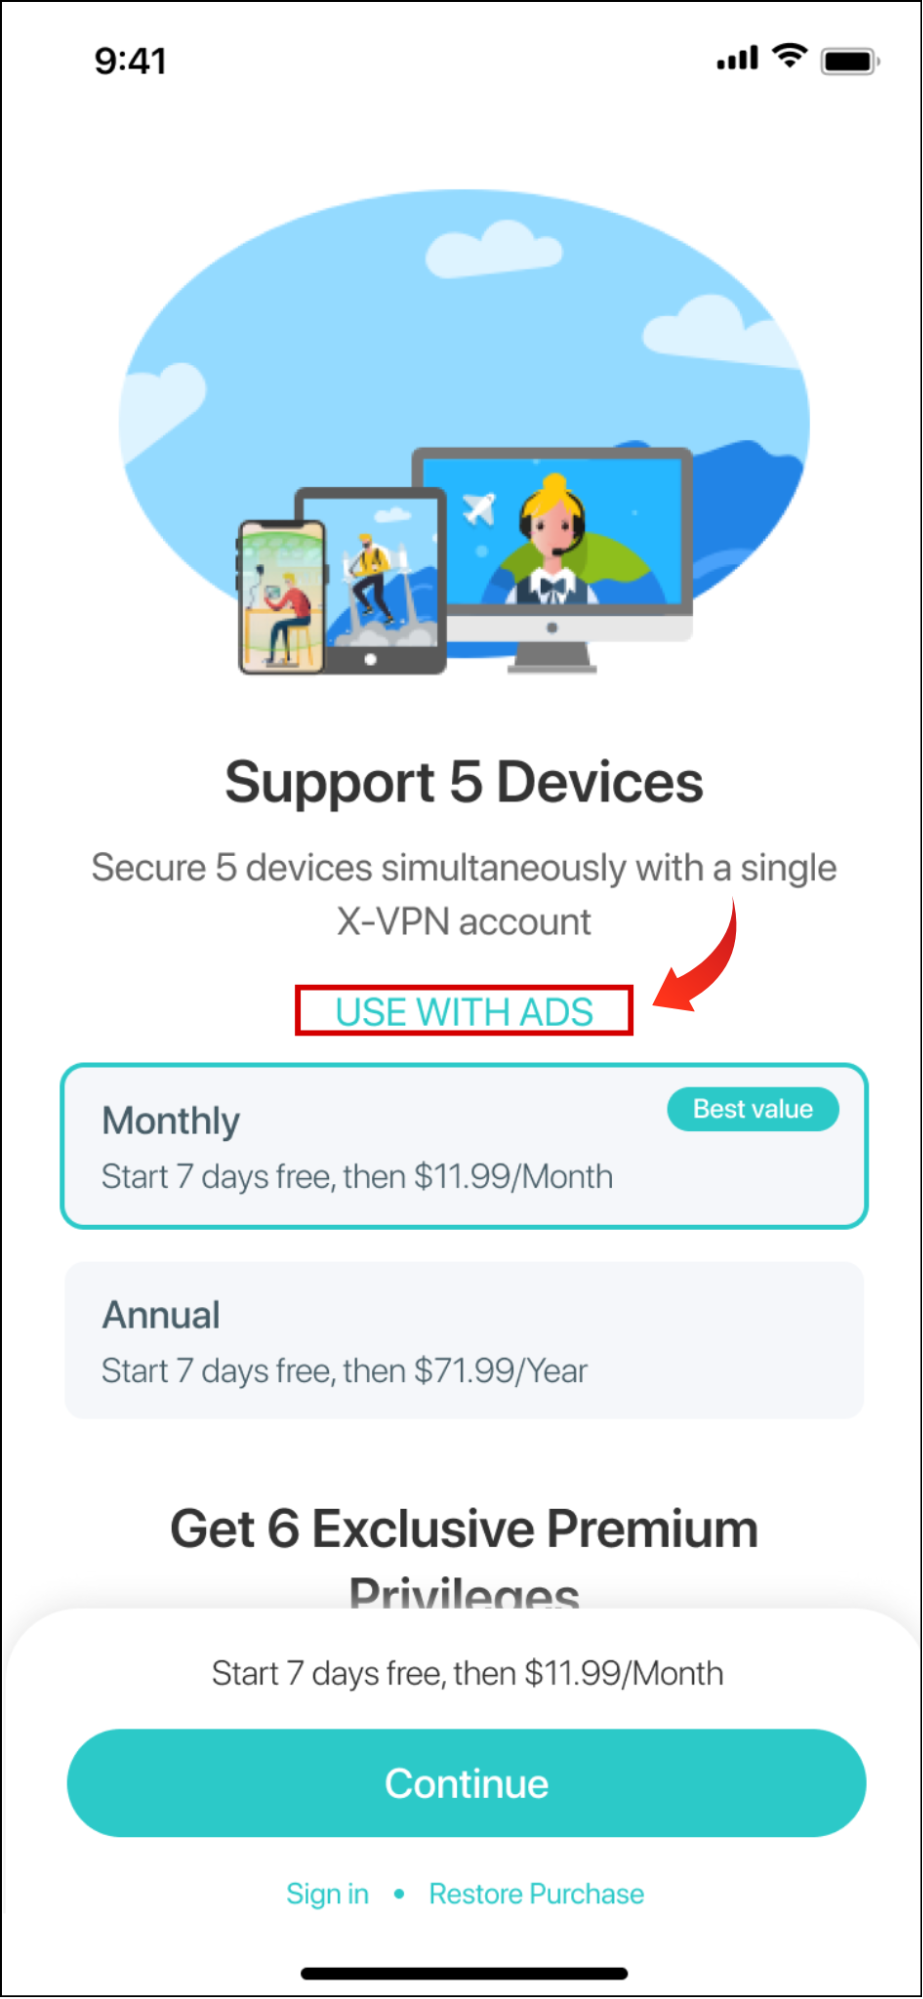
・As one of the best free VPN for iPhone, PC, or others, X-VPN gives preferential treatment to free users, but its premium version still offers more advanced VPN features and user benefits.
Connect/Disconnect X-VPN
・Once you enter the app, you will see the Quick Connect panel on X-VPN new UI Home page.
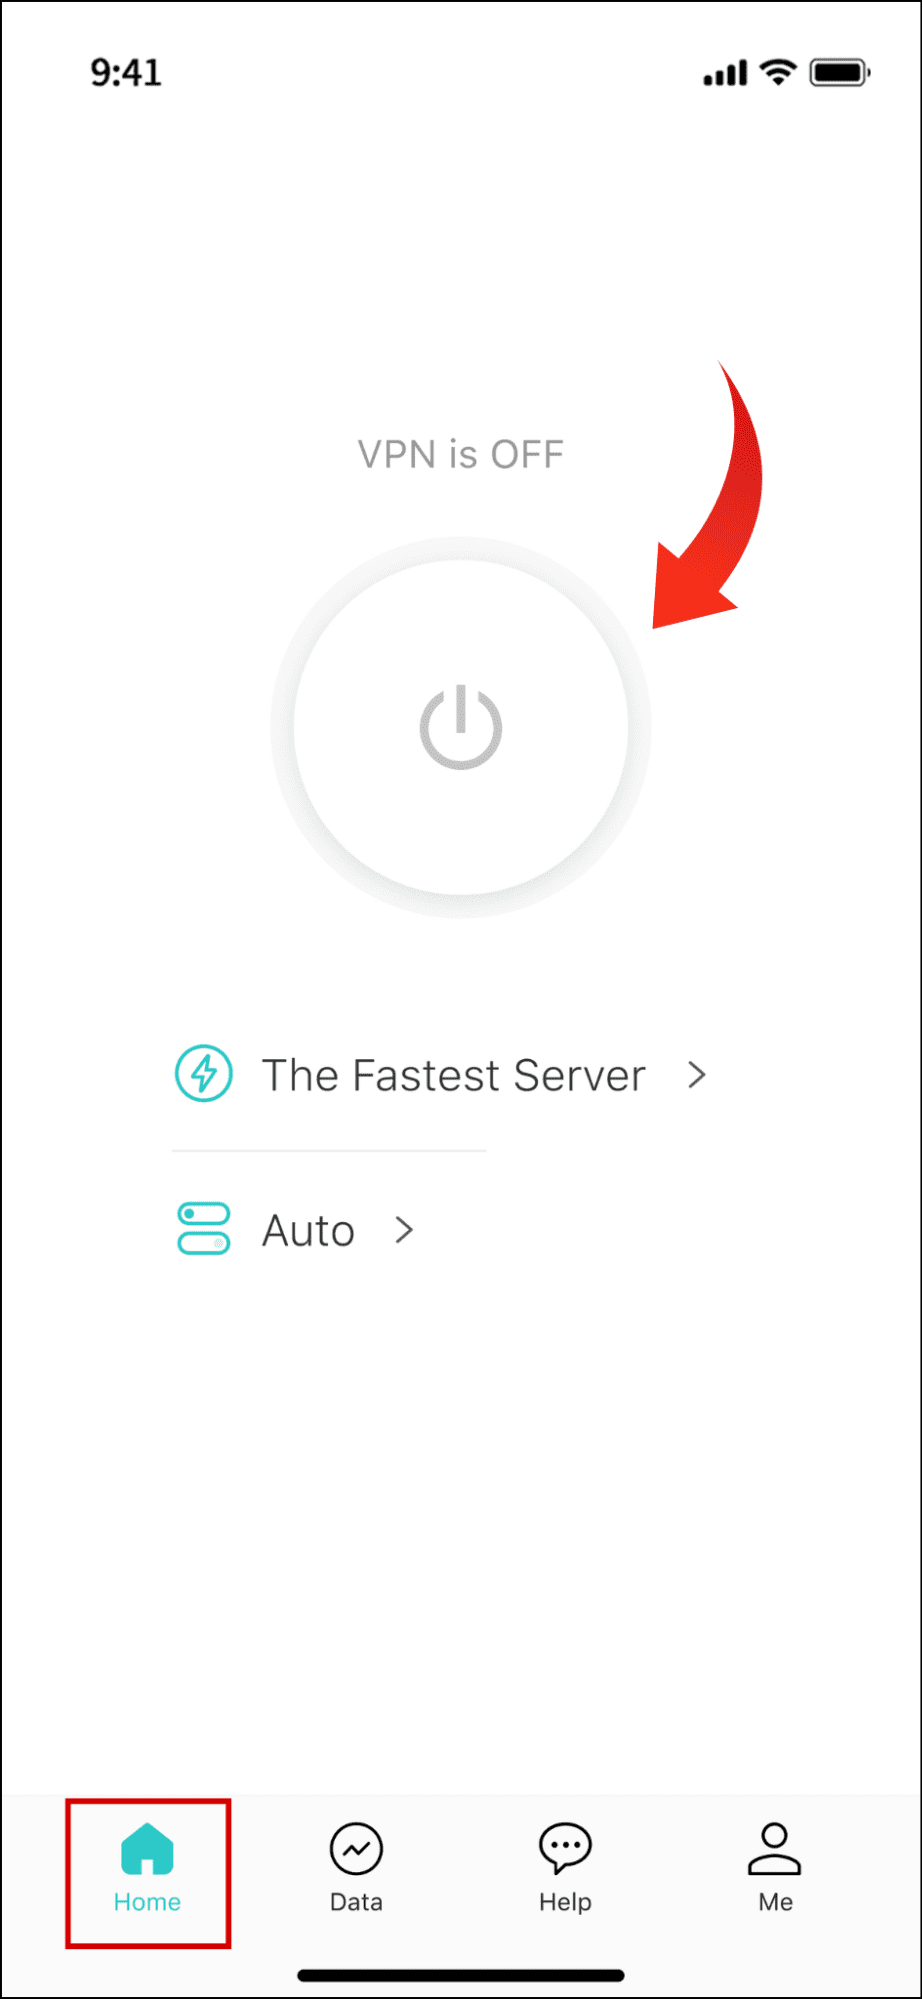
・To quickly connect/disconnect to the VPN server, just click the Quick Connect button located on the page center.
・You can monitor the VPN connection via the status display above the center button.
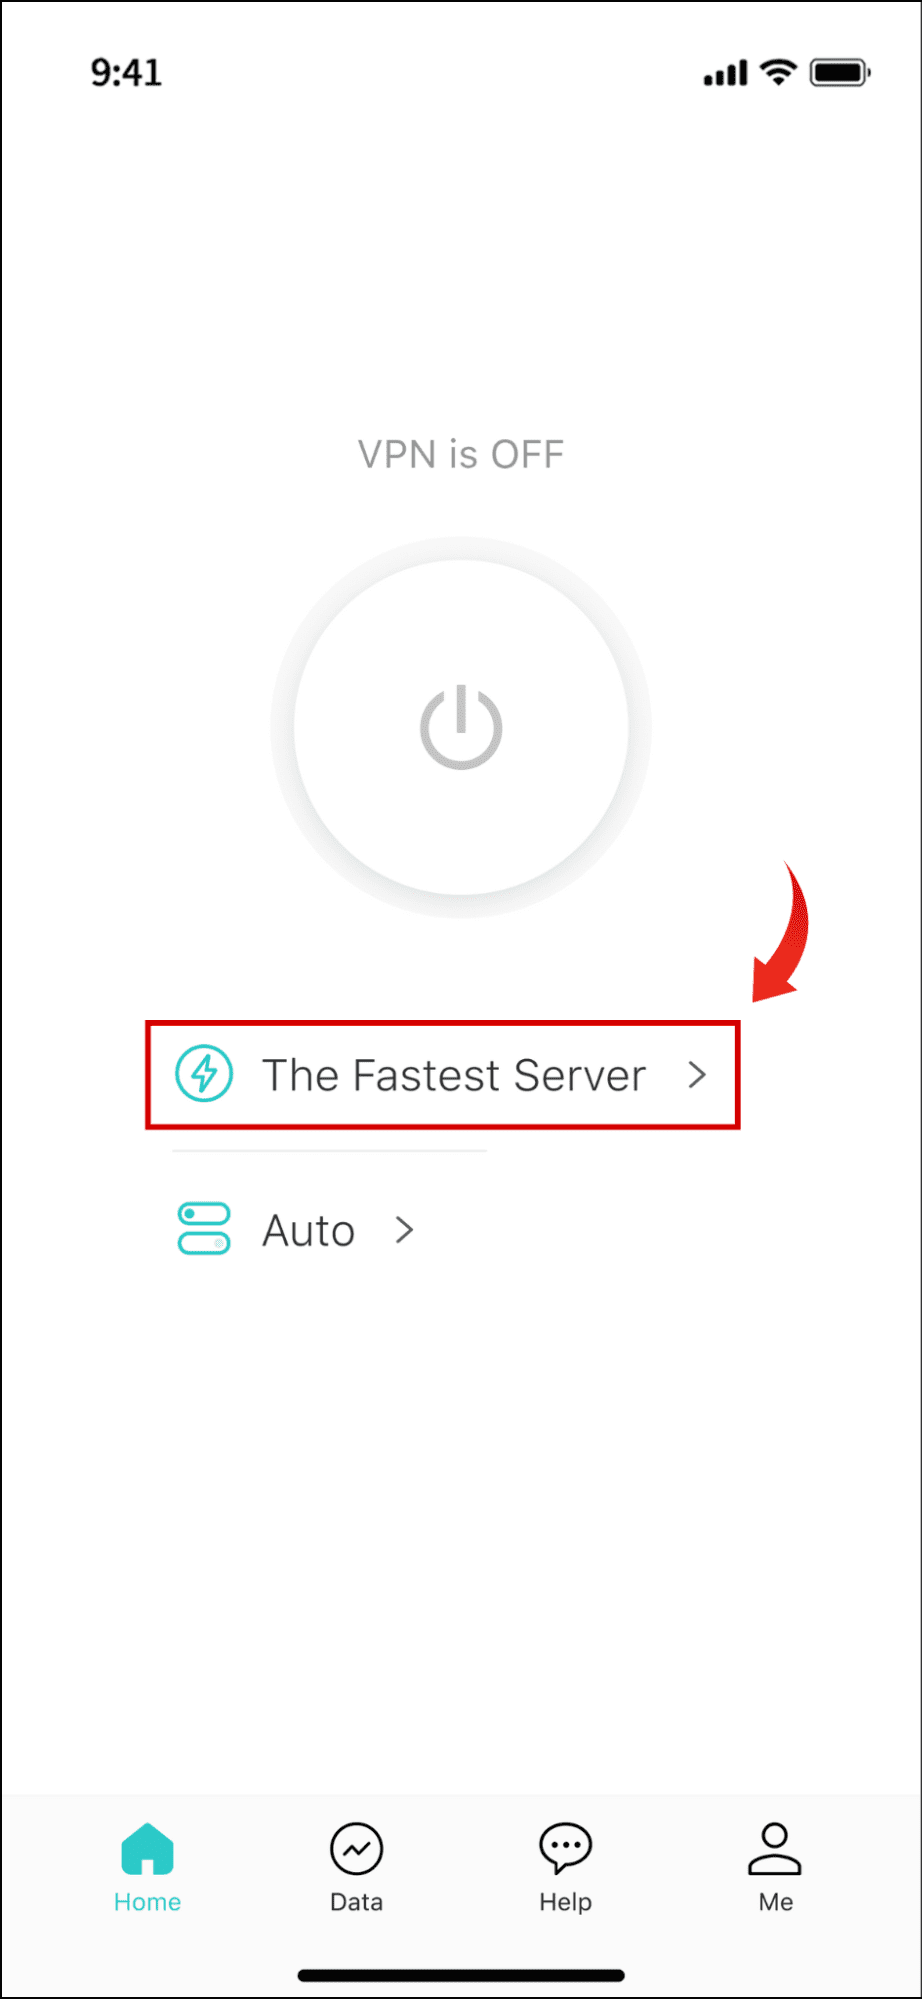
Choose a VPN Server Location
Step 1. To choose a specific VPN server, tap the Server option to enter the Server Location page.
For free users, you can only connect to the free server X-VPN assigned to you automatically.
Step 2. On the Location page, choose a server list you prefer.
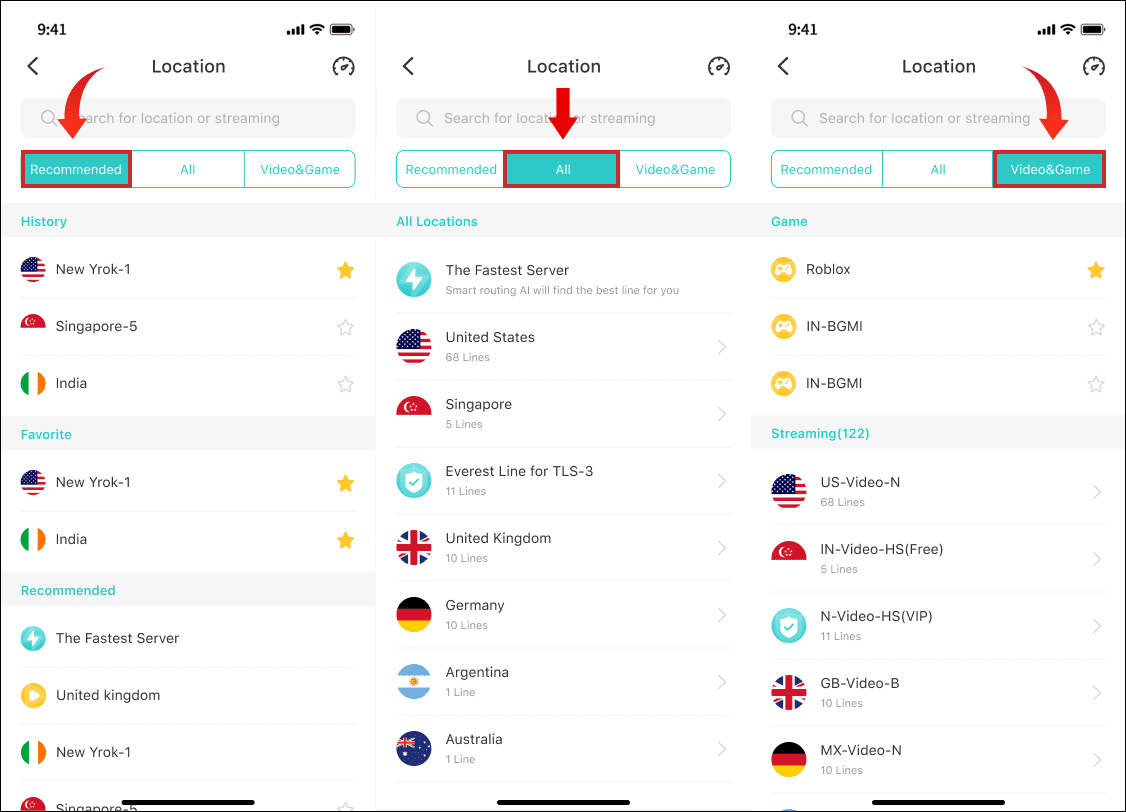
X-VPN offers 3 lists for you to select VPN servers efficiently.
・Recommended: Shows your server using history, your favorite servers, and servers recommended by the provider for quick speed.
・All: The full server lists. Now X-VPN owns 8000+ VPN servers in 225+ locations, you can hit the link to learn more info.
・Video&Game: X-VPN dedicated servers optimized for low-latency streaming and games.
Step 3. Choose your target country> desired region> a specific server to change your IP address, or just select one dedicated server for videos or games.
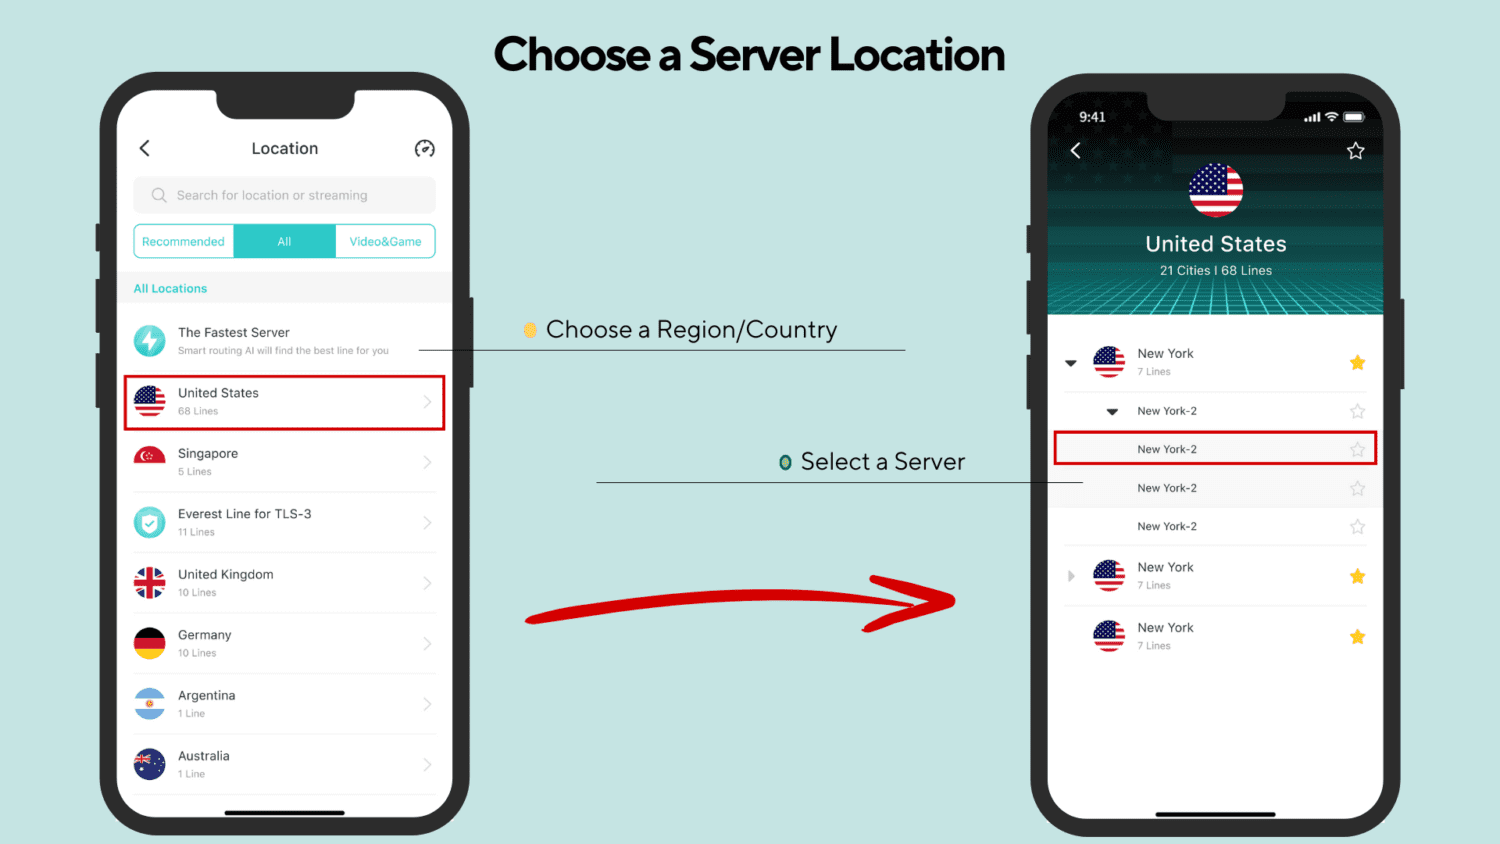
If you don’t have specific requirements for servers, X-VPN will automatically select the fastest server based on your geo-location.
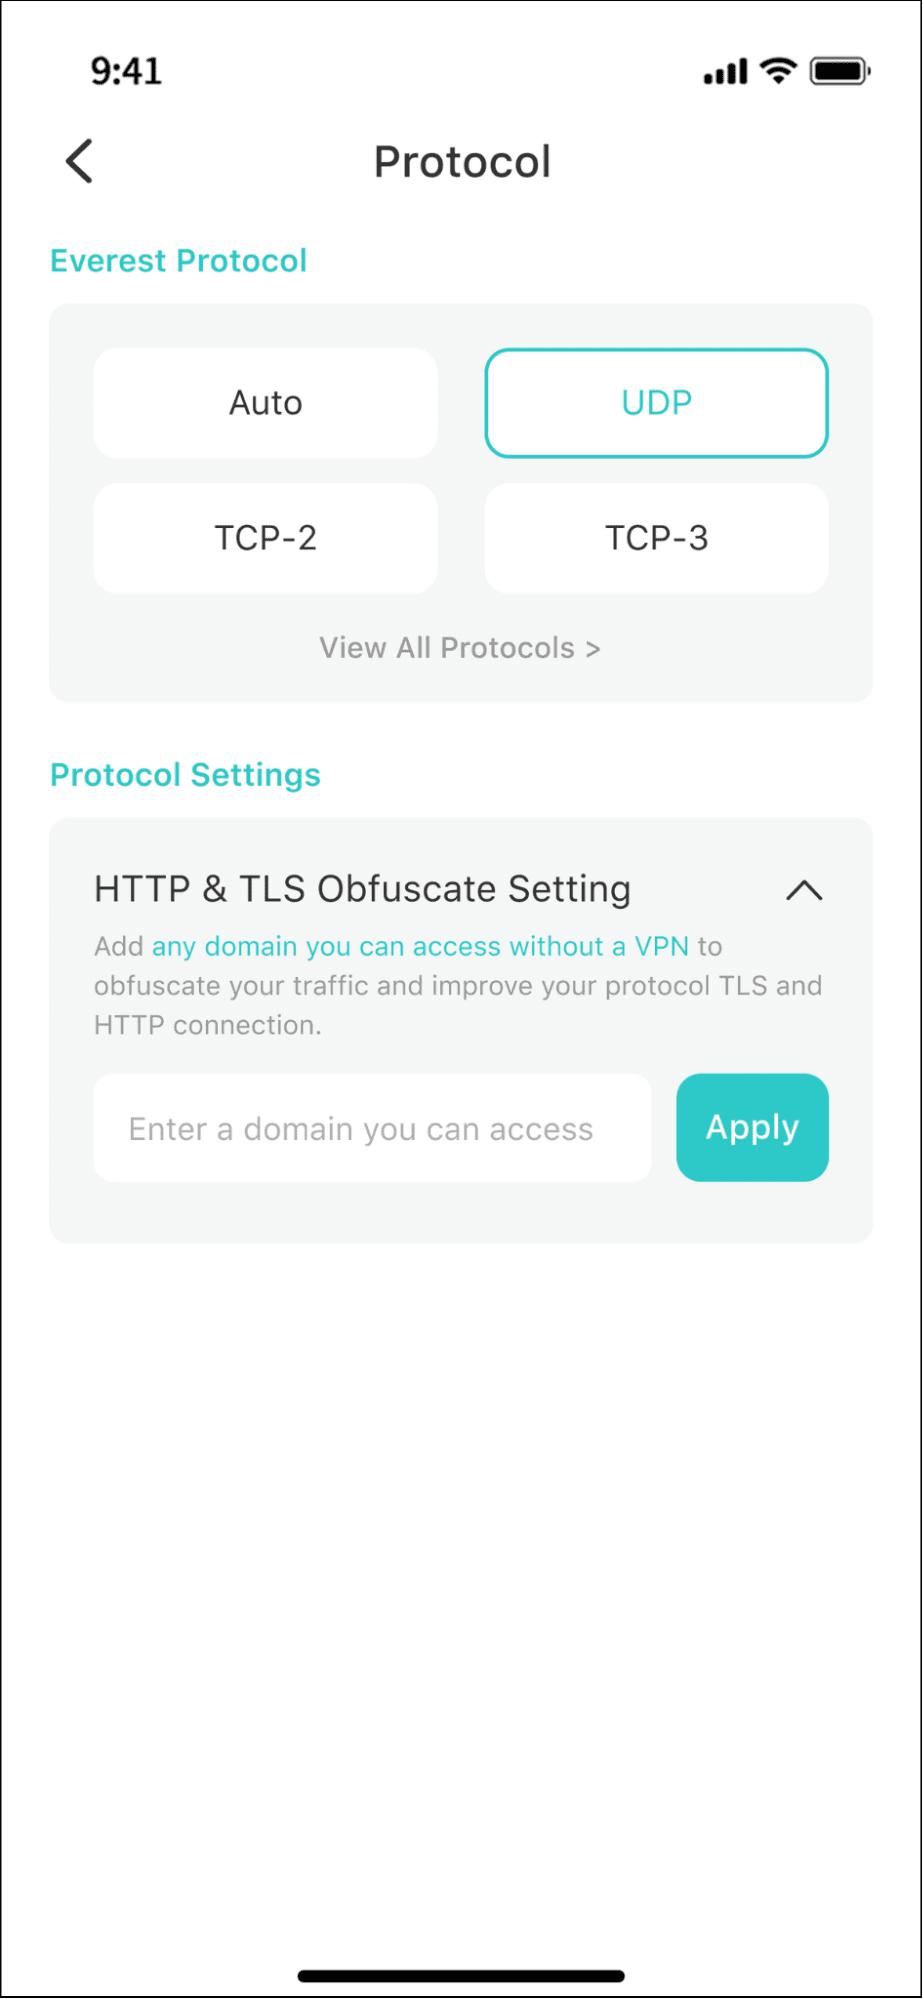
Choose a VPN Protocol
Step 1. To choose a VPN protocol, tap the VPN protocol option on the X-VPN Home page.
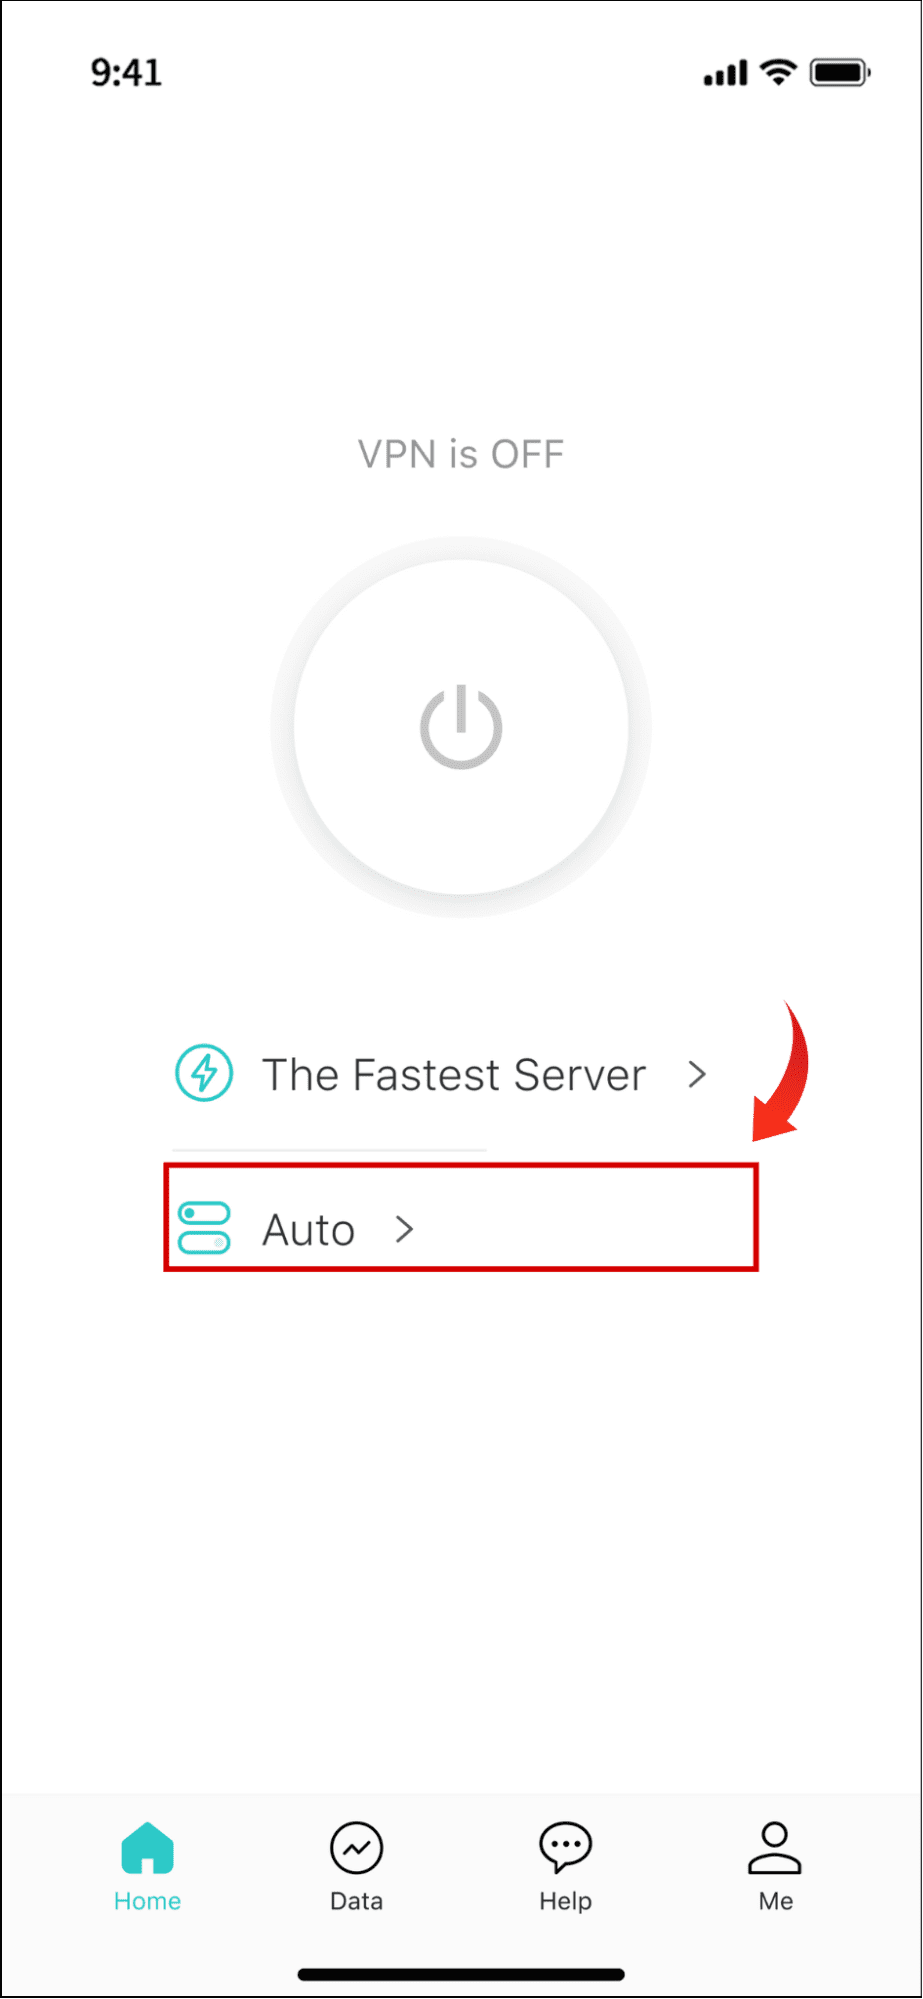
Step 2. Now you can hit the View All Protocols to choose the one you prefer. Or just set the Auto mode to let X-VPN convert the appropriate protocol automatically based on the network environment.
Data Monitor
Data Monitoring is a new feature introduced by X-VPN that helps users analyze VPN usage in real-time.
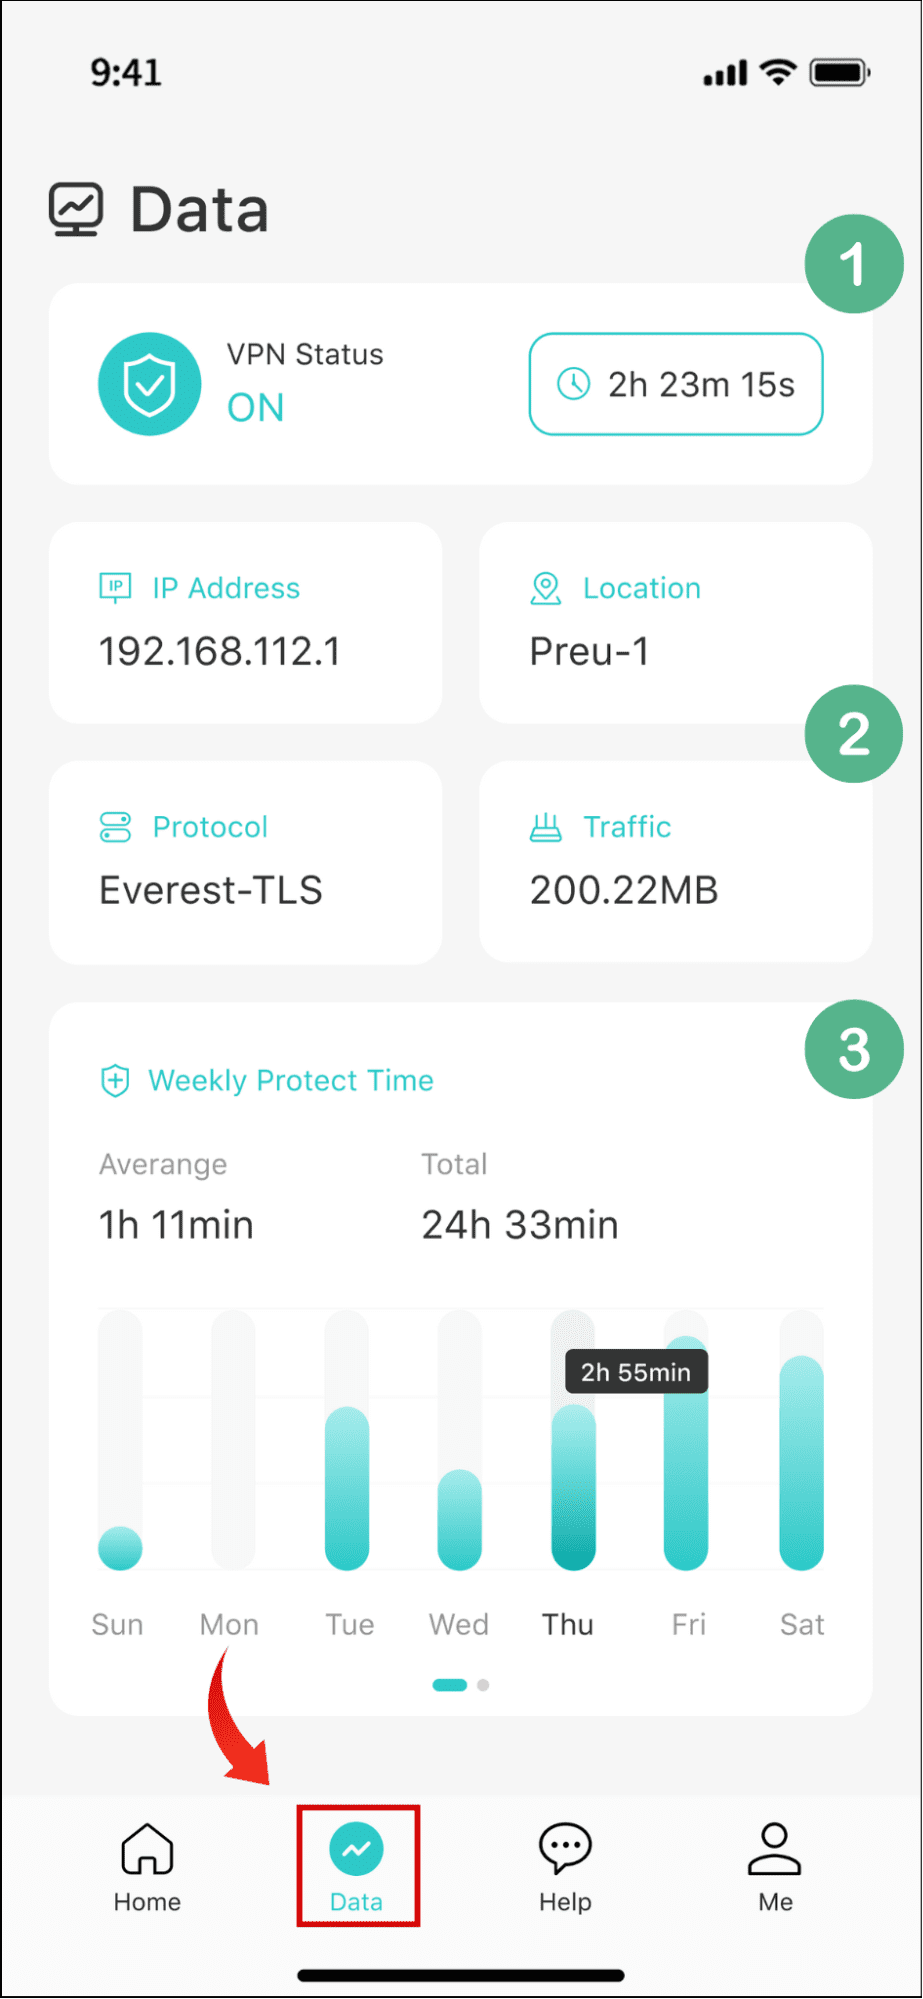
・Click on the Data button on the screen bottom to enter the VPN data page.
・There are 3 functional modules:
①VPN status and duration of use.
②Current IP address, location, protocol, and traffic usage.
③A bar graph and a line chart showing your weekly VPN usage time.
Attention
All data and private info displayed in this Data section will only be stored on your device and visible only to you. X-VPN has a strong No-log policy and promises never to record or sell your private data, including time of usage, browsing history, real IP address, and more.
Advanced Features
Step 1. To set up advanced VPN features, navigate to Me> Setting.

Step 2. On the settings page, you can configure VPN security features and other basic settings according to your needs.
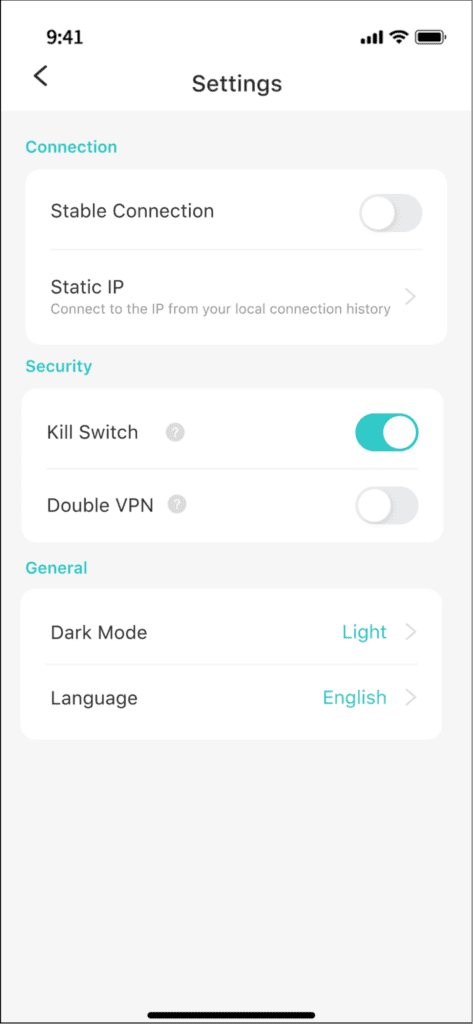
💡Security Features:
・Stable Connection: Stabilizes VPN connections and prevents frequent VPN disconnections.
・Static IP: Connects to the IP from your local connection history to get a constant network identity.
・Kill Switch: Automatically disconnects the internet once the VPN drops, preventing data leaks.
・Double VPN: Routes your data via two VPN servers for extra security and privacy.
💡Basic Settings:
・Dark Mode: Adjust the app appearance based on your preference or the system setting on device.
・Language: Change the app language you want to use.
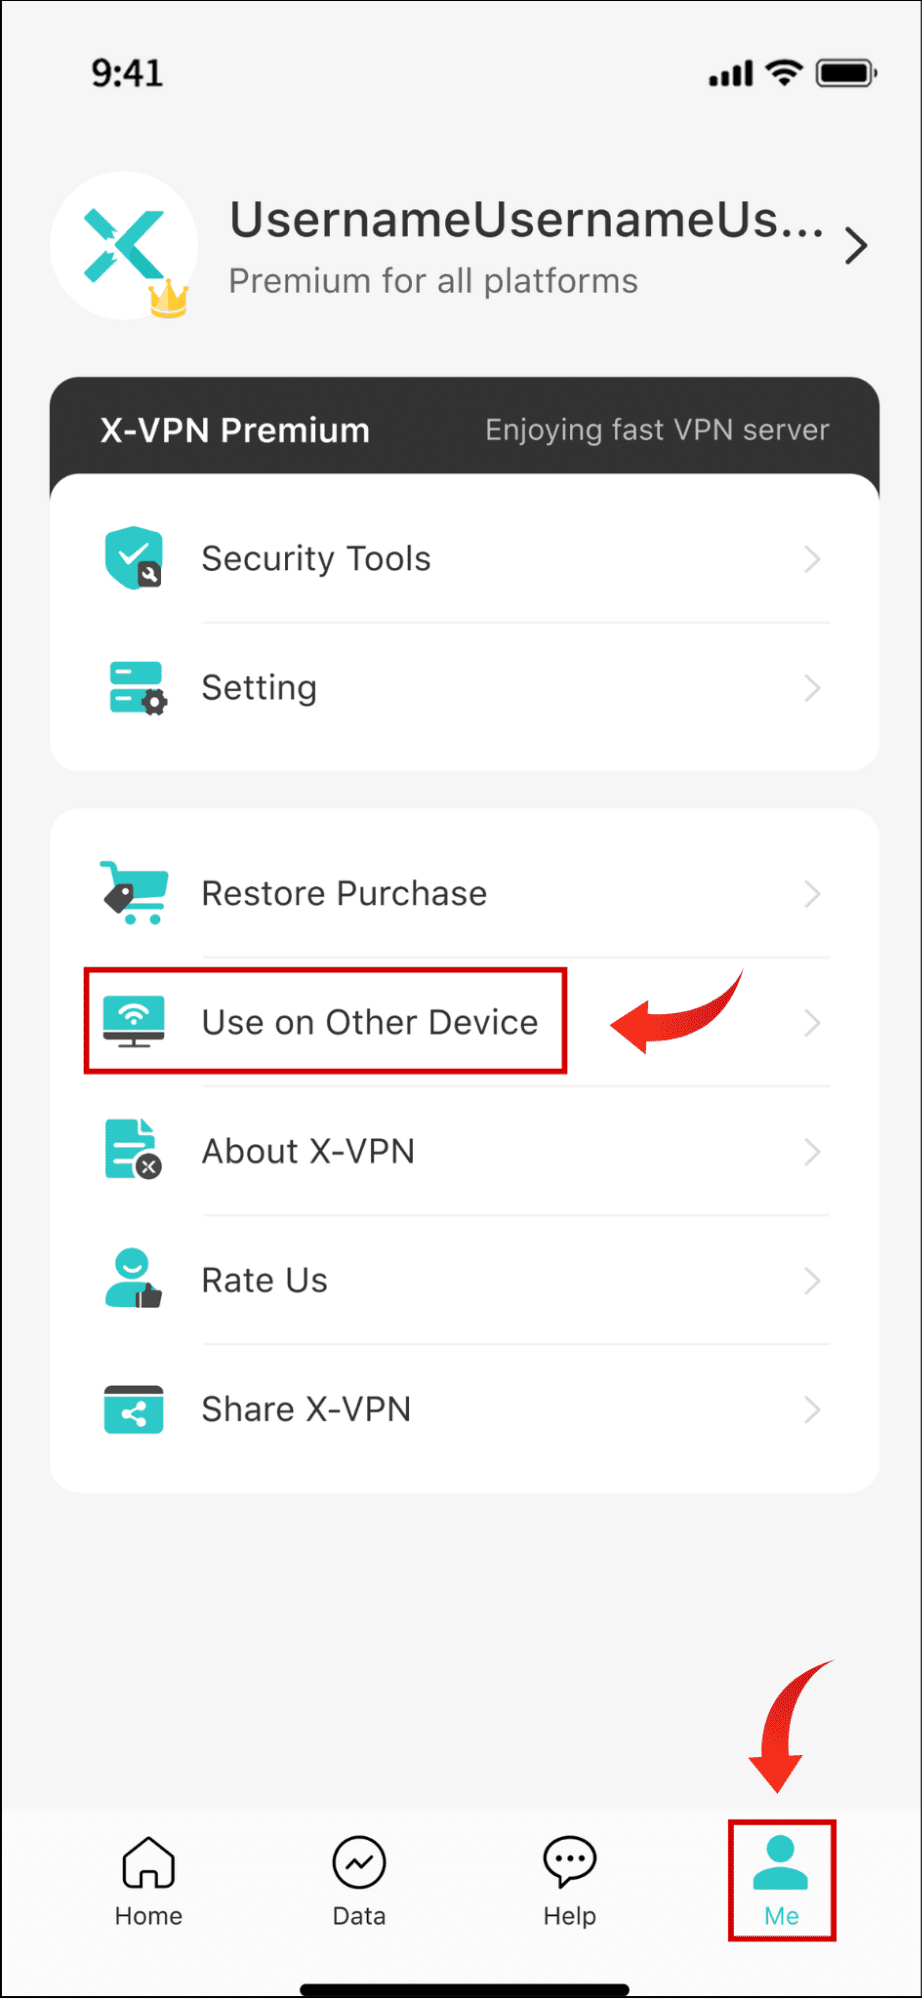
Use on Other Device
X-VPN supports up to 5 simultaneous connections, which means you can use the same account to log in to five different devices, like iPhone, iPad, PC, Android device, Smart TV, etc.
To make it even faster and easier for users to sync accounts or switch devices, X-VPN has built-in features as well.
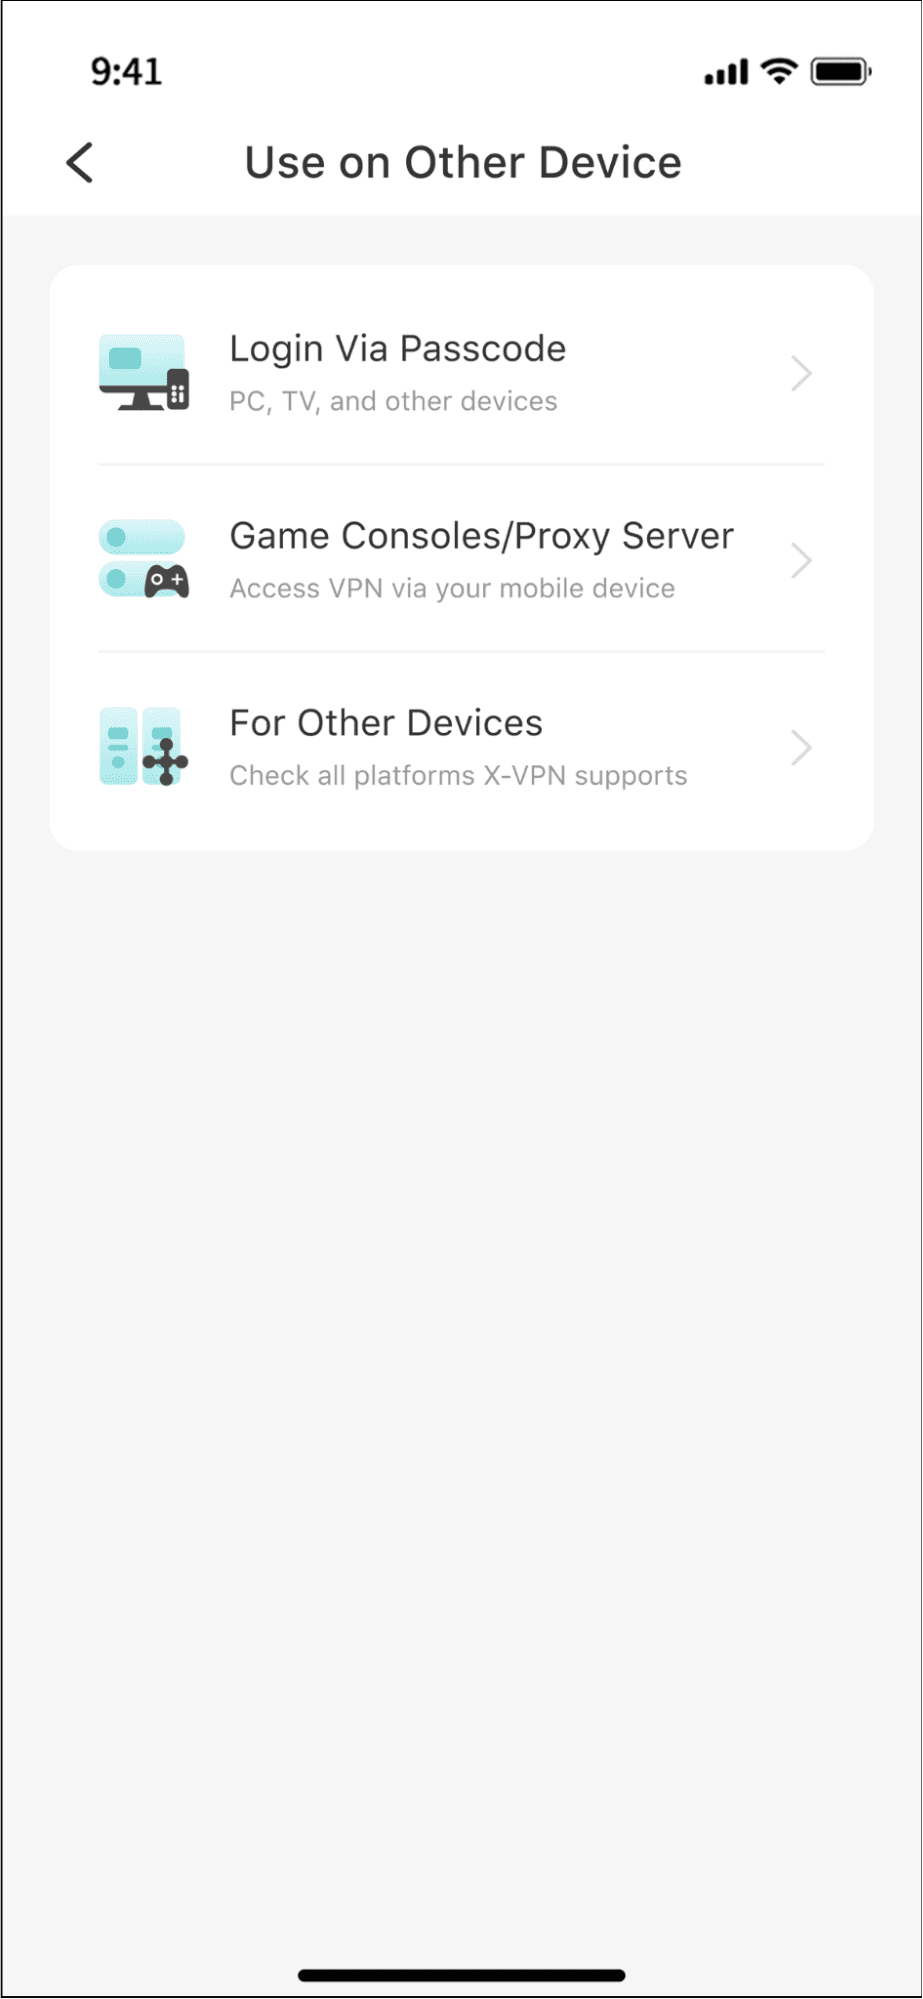
Step 1. Navigate to Me> Use on Other Device.
Step 2. Now you can see 3 options here.
・Login via Passcord: Login to other devices via verification of the same passcode.
・Game Consoles/Proxy Server: Configure the proxy servers to use VPN on Xbox, PlayStation, etc.
・For Other Devices: Check out what other devices X-VPN is compatible with.
Get Customer Support
Step 1. Hit the Help button on the screen bottom.
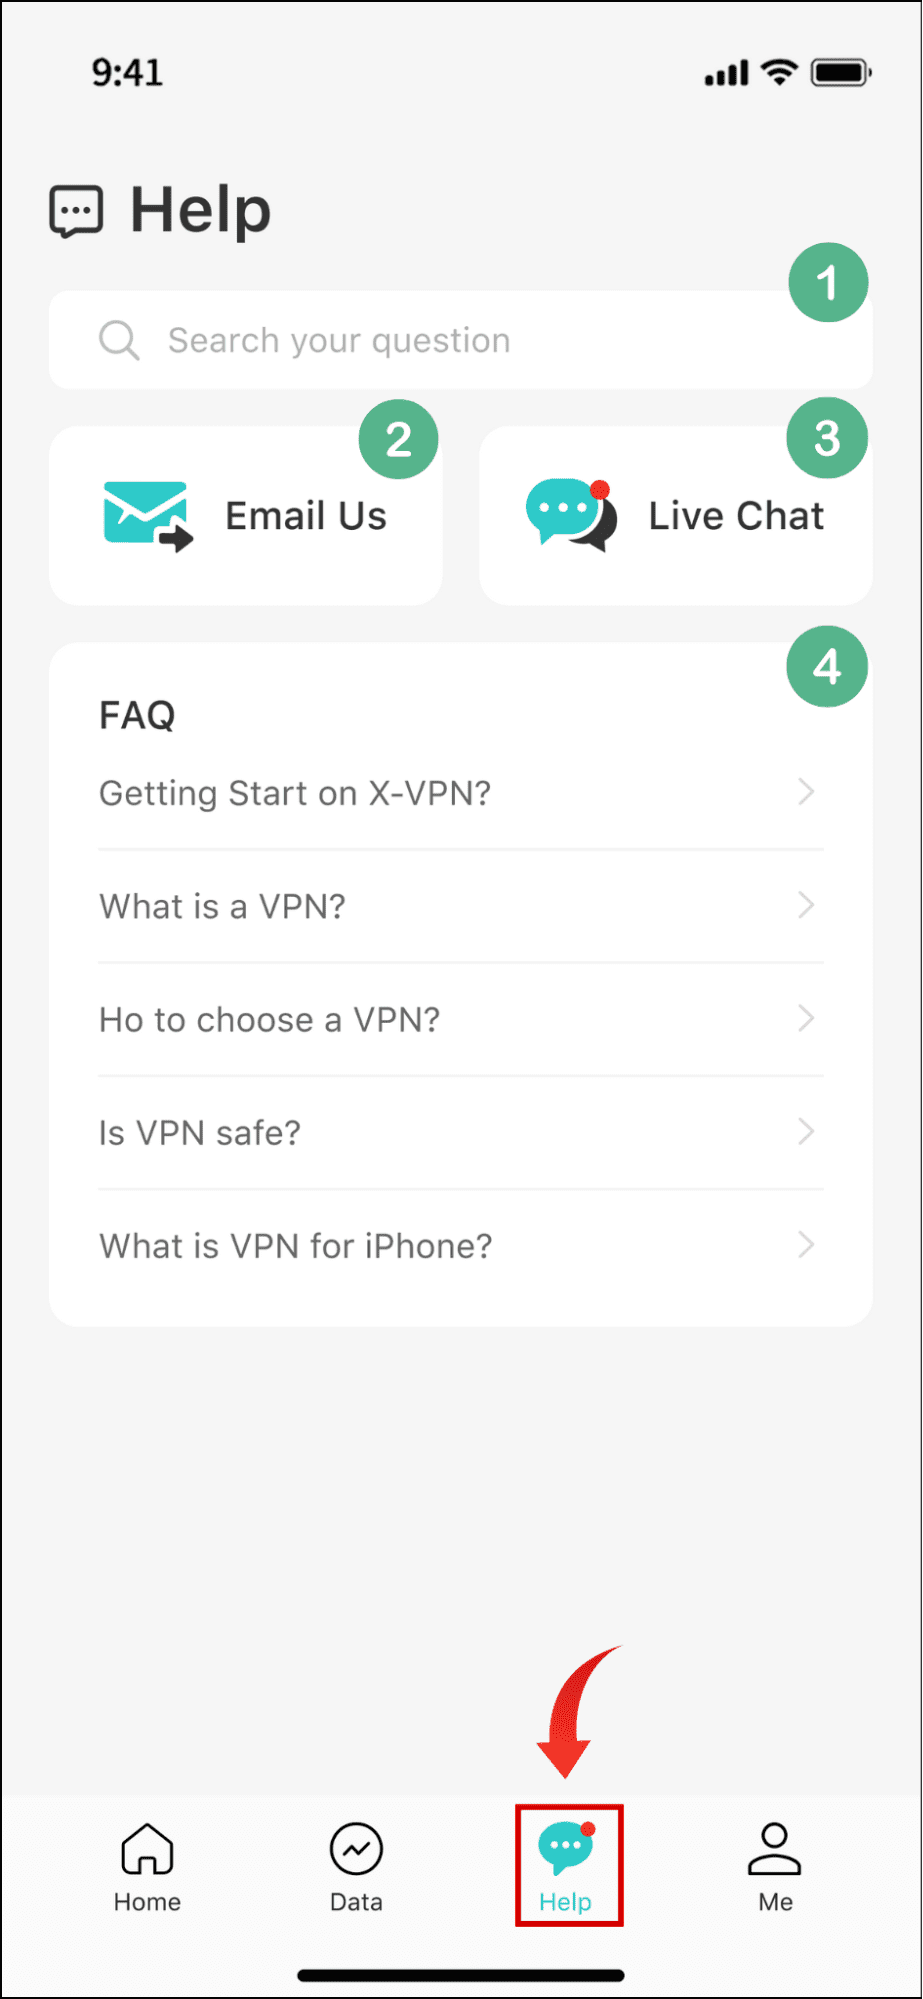
Step 2. Now you have entered the Customer Support page. Here are 4 functional modules you can use.
①Enter keywords to search your questions about how to use VPN.
②Send X-VPN an Email to get help.
③Enter a chat window and get 24/7 one-one live chat support.
④Get answers by checking out the frequently asked questions X-VPN provided.
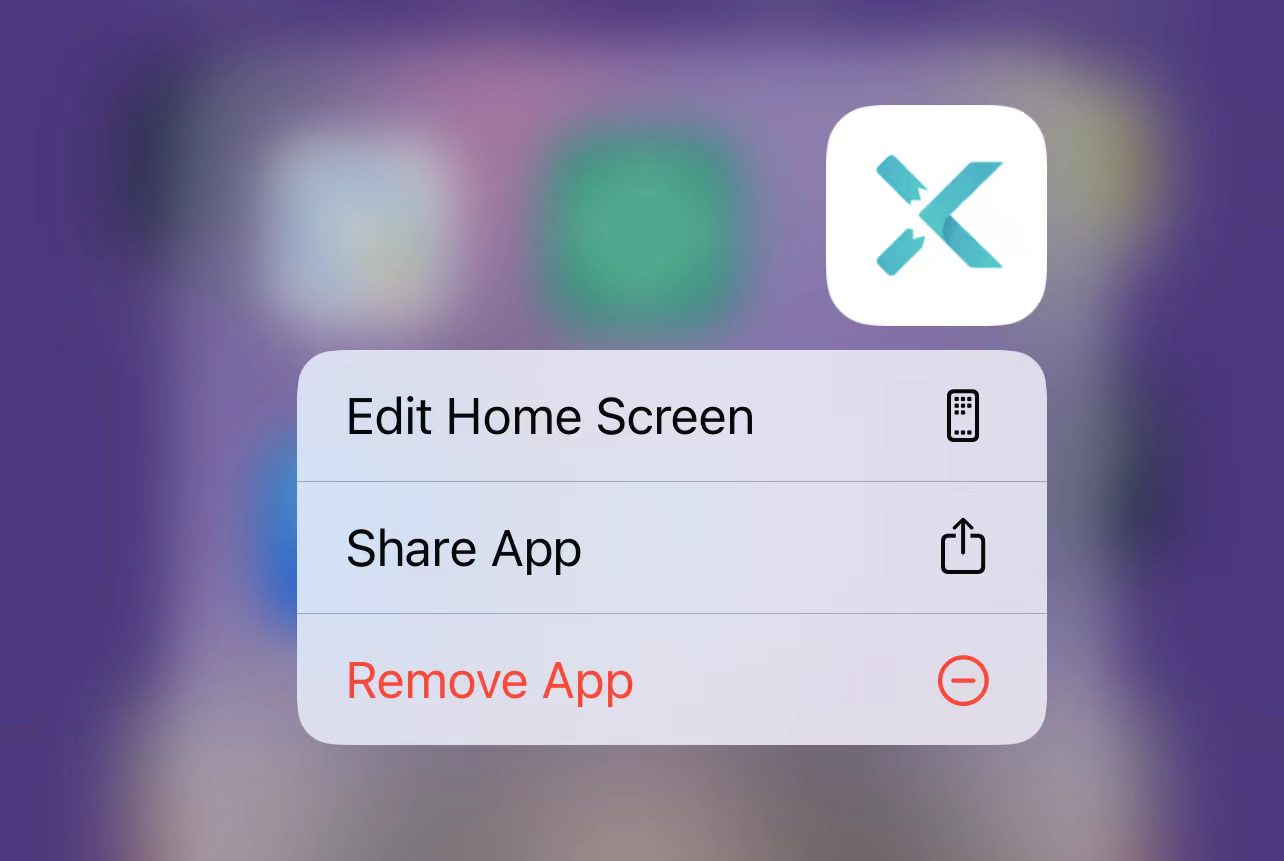
Uninstall the App
Step 1. Long-press the X-VPN app icon on your screen.
Step 2. Tap the Remove App button to uninstall it on your iOS device.
How to Choose a VPN for Your iPhone and iPad?
While many VPNs now support iOS, their availability varies greatly. To choose the most suitable provider for your iPhone or iPad, refer to the following factors:
・Performance: Choose a provider with a good reputation in the market – fast speeds, stable connections, and rich features.
・Server Locations: Ensure that the VPN you choose has sufficient server locations and worldwide network coverage.
・Privacy: Do confirm that the VPN adheres to a no-log policy and promises not to record your private data.
・Security: Premium VPNs support the highest level of AES-256 encryption algorithm with various VPN protocols.
・Compatibility: Strong compatibility and sufficient simultaneous connection can greatly enhance the usability of a VPN.
・Price: Choose a cost-effective product and prioritize providers with a free version or VPN free trial.
Pro Tip: The Best Free VPN for iOS in 2025
Here are 3 free VPNs for iOS that we recommend for you, both genuinely offer free versions that can be used for unlimited time, rather than a free trial.
All these VPNs are very newbie-friendly and you can download one according to your preference and set it up on your iOS device as we taught.
| X-VPN | TunnelBear | Windscribe | |
|---|---|---|---|
| Security | ⭐️⭐️⭐️⭐️⭐️ | ⭐️⭐️⭐️⭐️ | ⭐️⭐️⭐️⭐️ |
| Privacy | No-log Policy | No-log Policy | No-log Policy |
| Free Servers | 1000+ | 23 | 11 |
| All Servers | 8000+ | 5000+ | 480+ |
| Speed | Fast | Decent | Decent |
| Free Data | 500MB/day | 2GB/mon | 10GB/mon |
| Connections | 5 | Unlimited | Unlimited |
Sure, there are always limits to what a free VPN can do. For greater security, steadier connection, better unlocking capabilities, and richer features, consider upgrading to the X-VPN premium plan – 0 risks with a 30-day money-back guarantee!
Also, if you want to check the Top list of free VPN for Mac, read this blog.
Conclusion
In this blog, we have shown you how to set up a VPN on iOS devices and recommended the best 3 free VPNs for iOS. Now you can select your preferred provider with our tips, or just hit the button below to download and set up X-VPN on your iPhone and iPad!

💡To set up a VPN on other devices, read these blogs:
・How to Set Up a VPN on Windows 10/11?
・How to Set up a VPN on Android?
・How to Set up a VPN on Your Router?
FAQs
How to set up a VPN on an iPhone?
You can set up a VPN on your iPhone with a standout VPN app, like X-VPN. All you need to do is download the app and follow the prompts that pop up.
Here are simple steps for you, we will use X-VPN as an example.
Step 1. Download and install X-VPN on your iPhone.
Step 2. Open the app, agree to its Privacy Policy, and allow the VPN configurations.
Step 3. Enter X-VPN, sign in with a premium account, or just use it for free.
Does iOS have a built-in VPN?
No, iOS does not have a built-in VPN. However, iOS has a built-in function for users to configure VPNs manually. To do this, you can follow the steps below:
Step 1. Navigate to Settings> General, and head to VPN&Device Management on your iOS devices.
Step 2. Hit VPN> Add VPN Configuration.
Step 3. Now you can set up a VPN yourself.
Is there a free VPN for iPhones?
Yes, there are free VPNs for iPhones, and we recommended 3 top providers in our blog for you to choose from. The comparison table above highlights that X-VPN is an outstanding free product. It provides a truly free version for indefinite use. While the free server options are limited, X-VPN excels in security, privacy, speed, stability, and functionality, without imposing any traffic usage limits.