With the growing awareness of online security, using VPN to encrypt private data and bypass various internet restrictions is gradually becoming a hot topic. However, many users may not know how to set up a VPN on Windows yet.
Never mind, please read this blog and we will guide you to complete VPN setup on Windows 10 and Windows 11 with 2 methods.

Table of Contents
Why Do You Need a VPN for Your Windows PC?
First, let’s figure out what a VPN can do for us.
・Protect Data Privacy: VPN encryption is a key feature that safeguards your online data from being read or stolen by malicious actors.
・Browse Anonymously: VPNs change your IP address by routing your data through servers in other regions, making it impossible for third parties to track your real browsing history.
・Save Money: Many global products are priced differently depending on the region. By using a VPN to change your IP address, you can purchase items like YouTube Premium, Steam Keys, and Netflix Plan at the lowest prices.
・Access Regional Content: Bypass geo-restrictions on platforms like Netflix, HBO Max, and more to enjoy global content.
・Improve Security: Top-tier VPNs offer advanced features such as VPN Obfuscation, Kill Switch, and DNS Leak Protection, providing a robust shield for your online security.
Set Up a VPN on Windows 10/11 Automatically
For VPN configuration on Windows PCs, there are usually two methods, automatic and manual.
We recommend using the VPN client for automatic configuration for most Windows users. Simply download, install, and interact with the client to access all the VPN features—so easy but efficient.
Now let’s check the detailed tutorial with clear screenshots on how to set up a VPN on Windows 10/11 automatically. We’ll use X-VPN as our example, as it’s one of the best VPNs for Windows.
Please Note: You need a Windows device running Windows 7 or above.
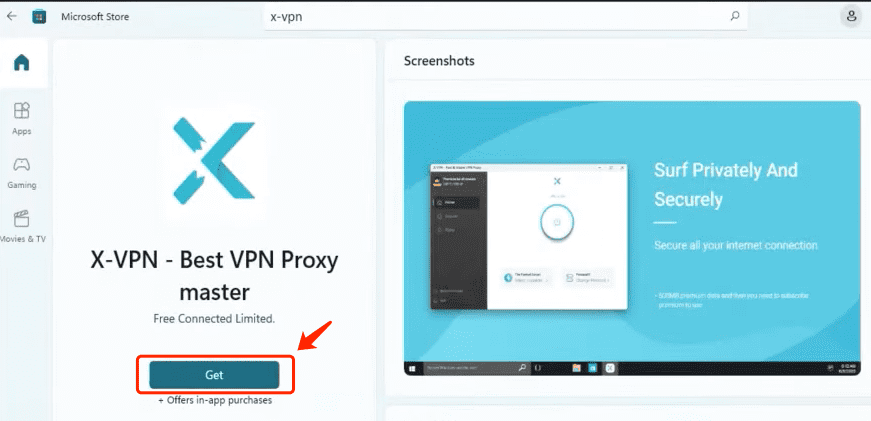
Download and Install VPN App
・Navigate to the X-VPN official site to get the VPN download on your Windows PC.
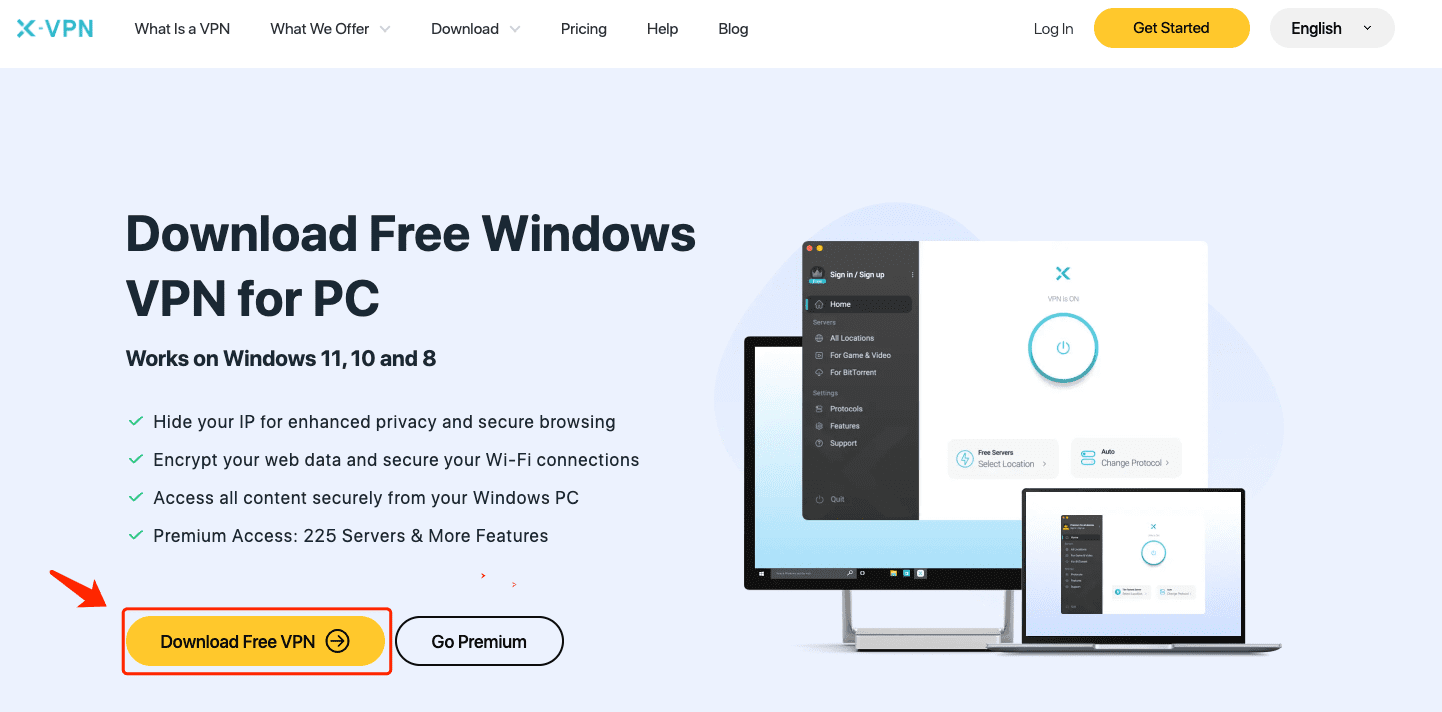
・Getting X-VPN from the Microsoft Store is another good way.
Run the VPN App
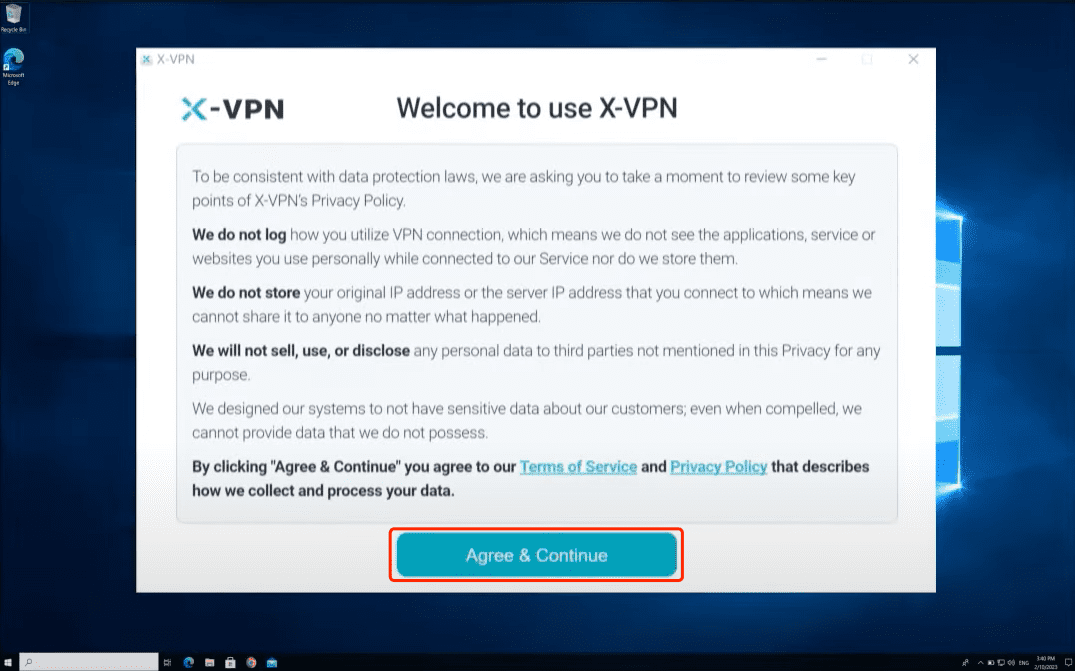
Step 1. Once installation is complete, open the app and agree to X-VPN’s Privacy Policy and Terms of Service.
Step 2. If you already have an X-VPN account, please sign in. If not, choose a Premium plan and sign up for an account. For free use, just enter X-VPN without an account.
・ As a standout provider, X-VPN offers generous treatment to free users – no speed limits, no expiration dates, and robust encryption. However, the features available to free users are somewhat limited compared to premium members.
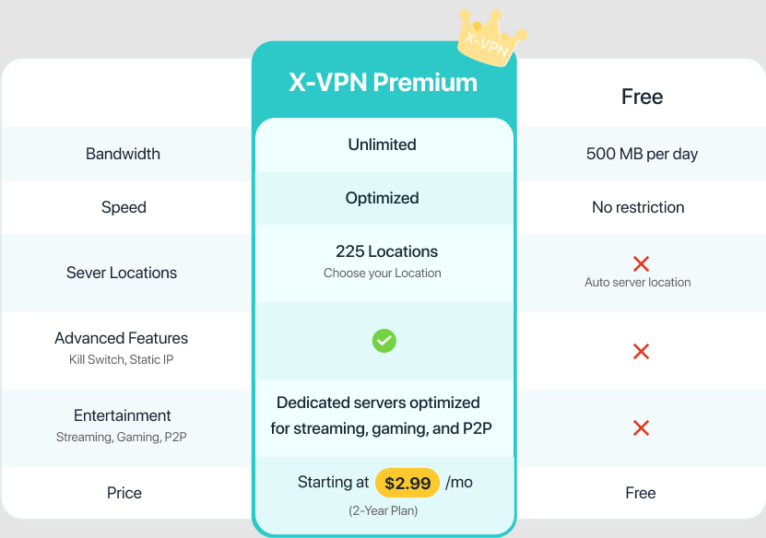
・Now X-VPN starts at only $2.99/mo, you can just hit the green button below to unblock all features for free for 30 days with its money-back guarantee.
・8000+ Servers ・Advanced Features・Additional Security Tools
Enter VPN Home Page
・When you start X-VPN, the VPN home page will be the first to greet you – it’s the area that every user frequents most, and also the main feature of our service.
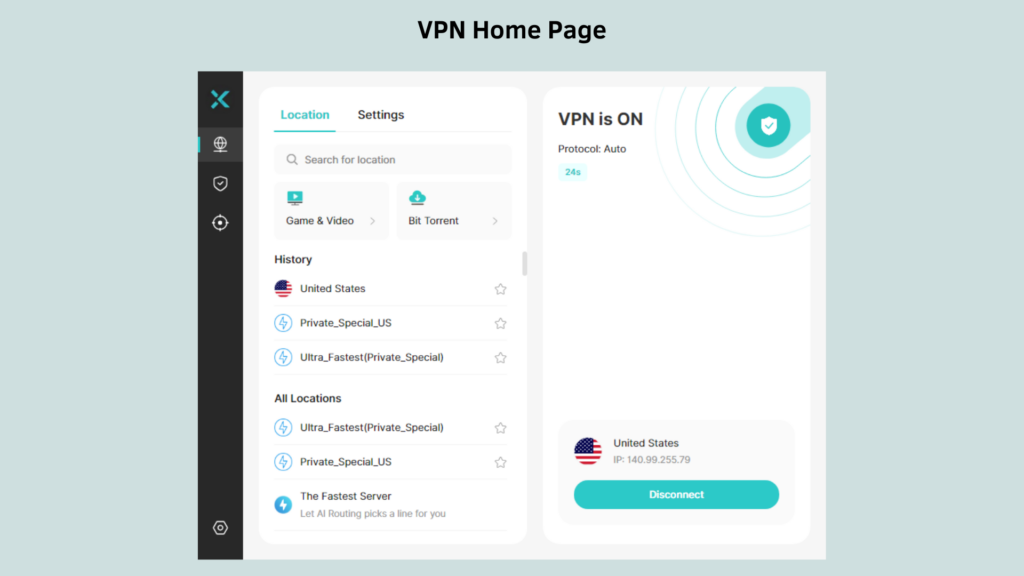
・To enhance the user experience, we’ve centralized the Select Location, VPN Settings, and Quick Connection sections in one interface.
Select VPN Server
Step 1. You can now see the detailed Location settings directly on the left side of the page. The top-to-bottom feature panel includes:

・Manual Search Bar: Directly enter your target country/city to locate your desired server quickly.
・Dedicated Servers: Server optimized for specific purposes including gaming, streaming, and Torrenting.
・History: View previous connection history for quick reconnections.
・All Locations: Scroll down to see a detailed list of 8000+ servers in over 225 locations.
Step 2. Check the detailed list of VPN servers in all locations. Navigate to your target country>region, and hit a specific server to connect automatically.
Using Tips
1. Hit the Country name to expand the server list.
2. To save the server, tap the star icon to favorite it.
3. Tap the For Game & Video or For BitTorrent option to choose the dedicated servers X-VPN provided.
2. To save the server, tap the star icon to favorite it.
3. Tap the For Game & Video or For BitTorrent option to choose the dedicated servers X-VPN provided.
Set VPN Settings
Step 1. Click the button next to “Location” to switch to the VPN Settings interface. Here, you can:
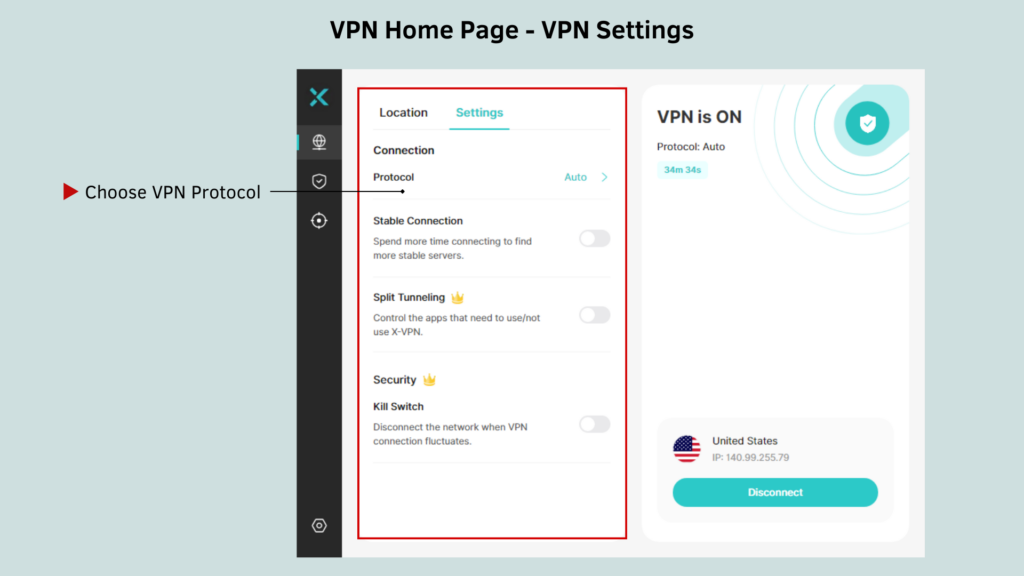
・Manually select the VPN protocol that suits your needs or change to Auto mode, where X-VPN will automatically choose the most suitable option for you.
・Customize VPN features to enhance your online experience.
Quick Connection
Step 1. Check the VPN Connection info on the Quick Connect panel, which is on the right side.
・VPN connection status
・VPN protocol currently in use
・Length of VPN usage
・Connected server
・Currently used IP address
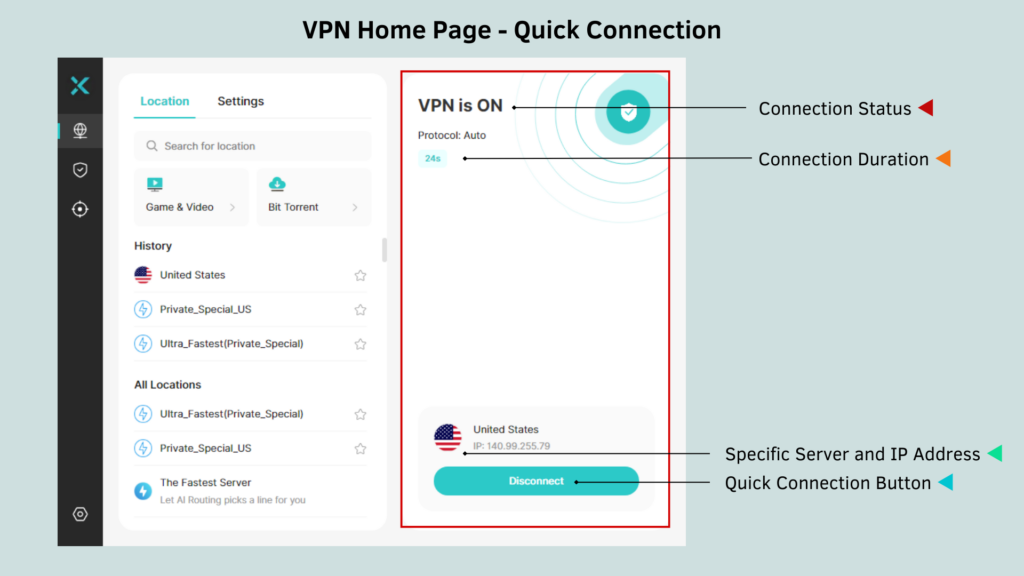
Step 2. Just click the Quick Connect button to easily connect or disconnect the VPN in seconds.
Use Additional Security Tools
To provide a higher quality of service, X-VPN for Windows has been newly upgraded and aspires to be your comprehensive privacy and security solution with the integration of 3 new security features – Safe Browsing, Computer Security and Identity Protection. To find them:
Step 1. Click on Security or Dark Web Monitor in the left navigation bar to access all the security tools that are currently updated.
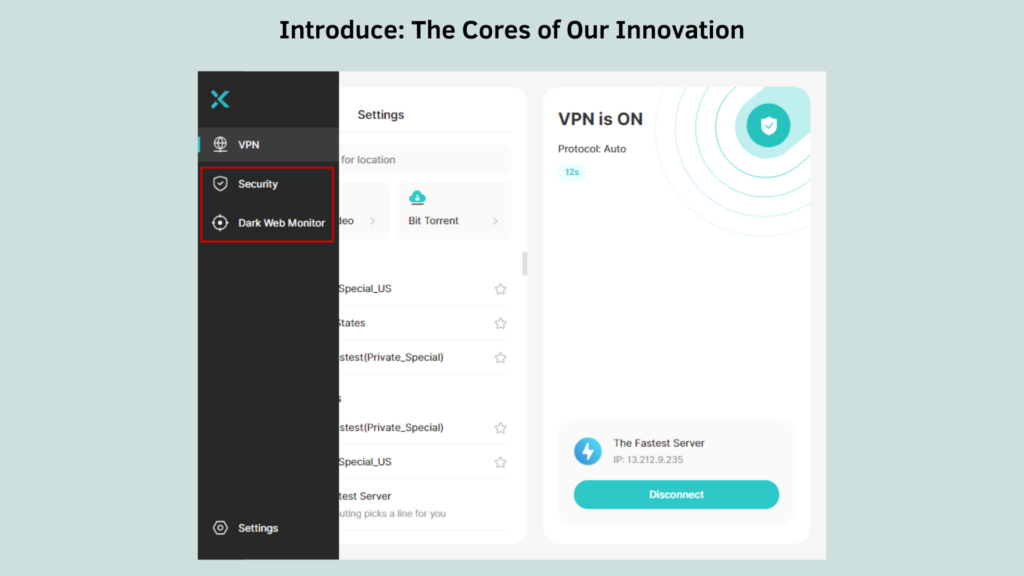
For the Security section, you can find:
・Browser Protection: Block trackers, prevent malicious websites, and stop malicious downloads.
・Ad-Blocker: Clean online browsing with all types of ads, including banners, video ads, and pop-ups.
・Storage Cleanup: Automatically cleans up disk space for you according to a customized schedule.
・Startup: Disable unnecessary startup items to speed up booting.

For the Dark Web Monitor section, you can:
・Bind up to 5 private email addresses and let X-VPN scan the dark web database for you daily to effectively prevent identity leakage.

Note
All of the above added security features can be used independently of the VPN service and are integrated into the X-VPN Premium plan – Yes, only $2.99/mo for full service.
You can read the blog to learn more details about the new X-VPN for Windows or just click the button below to personally experience all the premium features for free with a 0-risk refund policy.
You can read the blog to learn more details about the new X-VPN for Windows or just click the button below to personally experience all the premium features for free with a 0-risk refund policy.
・8000+ Servers ・Advanced Features・Additional Security Tools
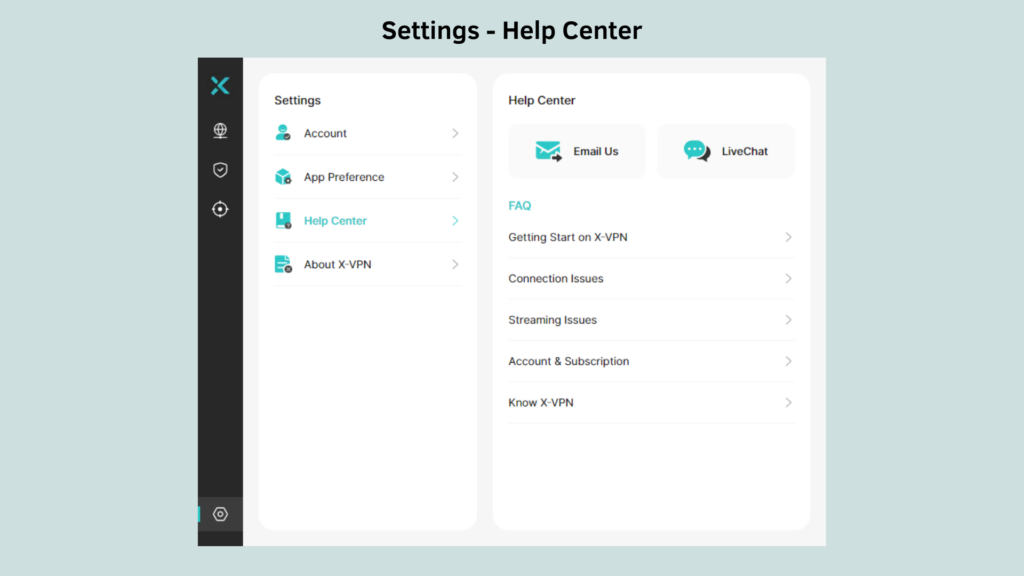
Now the VPN setup on your Windows 10/11 is complete! If you meet some issues, contact us via Settings> Help Center> Email Us or Live Chat.
Set Up a VPN on Windows 10/11 Manually
Of course, if you prefer not to be limited by apps and want to configure a VPN on your own, you can use the built-in features on both Windows 10 and Windows 11.
In the tutorial below, we’ll guide you via the step-by-step process using Windows 10 as an example. Don’t worry, Windows 11 users – the steps are the same.
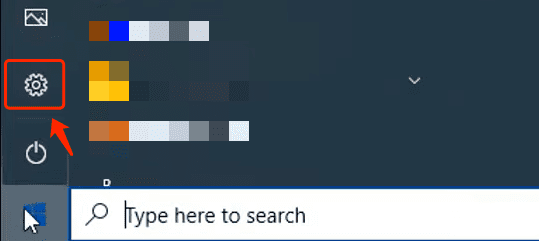
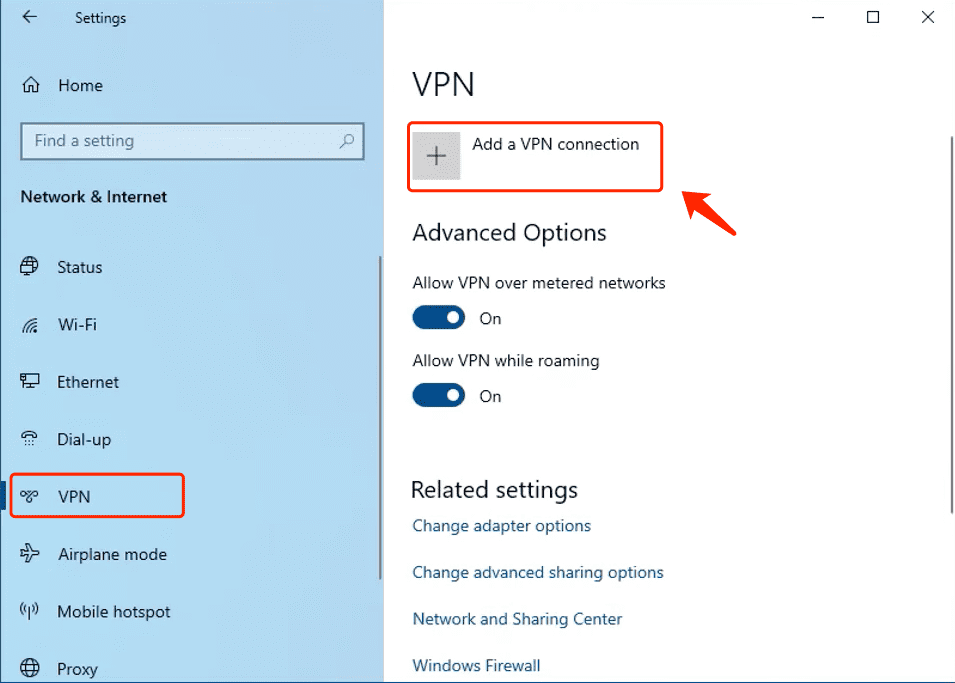
Step 1. Navigate to the Windows Start icon> Settings.
Step 2. On the Windows Settings, head to Network & Internet> VPN> Add a VPN connection.
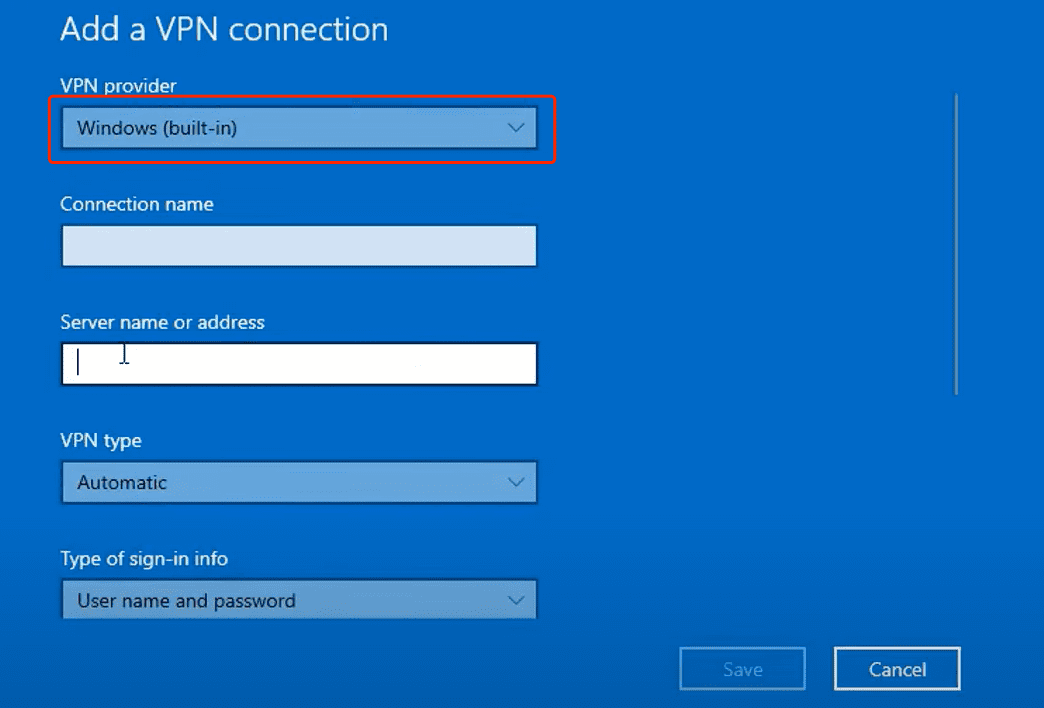
Step 2. A configuration window will pop up:
- Set Windows (built-in) as the VPN provider.
- Customize the VPN name.
- Enter the name or address of the server you want to configure.
- Set the VPN type and login info.
- Click Save to finish the VPN configuration.
Step 3. Now back to the VPN Settings page to check your VPN. Click the VPN option, here are 3 options. You can hit them to Connect, Remove, or edit advanced options.

However, configuring a VPN manually requires you to obtain, input, and regularly update all the necessary VPN info yourself. For most users, it’s more convenient to let a VPN app handle these tasks. Additionally, VPN apps offer a range of features and provide stronger privacy protection.
So even though we provide detailed steps for you to set up a VPN on Windows manually, we don’t recommend this approach unless you have a specific reason for doing so.
Pro Tip: 3 Free VPNs for Windows Recommended
If you’re inclined to set up a VPN on your Windows 10/11 automatically but are unsure how to choose the right VPN app, don’t worry.
Many top providers offer free plans, which not only benefit free users but also allow those interested in advanced VPN features to try them out before committing to a paid plan.
| X-VPN | Proton VPN | TunnelBear | |
|---|---|---|---|
| Security | ⭐️⭐️⭐️⭐️⭐️ | ⭐️⭐️⭐️⭐️ | ⭐️⭐️⭐️⭐️ |
| Privacy | No-log Policy | No-log Policy | No-log Policy |
| Login | No Need | Need | Need |
| Free Servers | 1000+ | 5 | 23 |
| All Servers | 8000+ | 5000+ | 5000+ |
| Speed | Fast | Limited | Decent |
| Free Data | 500MB/day | Unlimited | 2GB/mon |
| Connections | 5 | 1 | Unlimited |
Alternatively, you can also directly download X-VPN and experience its premium services with 8000+ global servers and complete security features – as it offers a 30-day money-back policy for 100% success.
Conclusion
This blog provides a detailed guide on how to set up a VPN on Windows 10/11 in two ways. Manually configuring a VPN is more suitable for those with specific needs or work-related purposes, while for most users, simply clicking the button below to download X-VPN for an easier and safer surfing experience is the best.

FAQs
Does Windows have a built-in VPN?
No, Windows does not have a built-in VPN, but a built-in feature that can support you to configure a VPN manually. To use this feature, you need to prepare the relevant configuration info in advance, including the VPN server address, VPN type, and login credentials, then follow the instructions below:
Step 1. Navigate to Windows Start> Settings> Network & Internet>VPN>Add a VPN.
Step 2. In the pop-up window, select Windows(built-in) as the VPN provider and input all the info you prepared.
Step 3. Save the VPN, and now you can connect to it.
How to connect to a VPN on a Windows laptop?
The best way to connect to a VPN on your Windows laptop is to download a VPN app. Top-tier VPN providers, like X-VPN, not only offer applications that can set up a VPN on your laptop automatically within a minute, but also ensure global server connection, rich protocols, and advanced security features. Also, if you prefer a hands-on approach, you can manually configure a VPN using the built-in features of Windows. Comprehensive tutorials for both methods are available in this blog post.
Is there a 100% free VPN?
Yes, X-VPN is a 100% free VPN that never skimps on providing quality service to free users. X-VPN provides a real free version with no usage time limit, and no login. Free users just need to download the app and connect to the fastest free server within a few seconds.