Wondering how to change IP address Windows 11? Maybe you’re worried about online privacy, tired of region restrictions, need to access websites from other countries, or just want to fix a stubborn network issue. Whatever the reason, changing your IP address is easier than you think. In this guide, we’ll show you 6 simple ways to change your IP address on Windows 11!
Table of Contents
TL;DR: 6 Ways to Change Your Public IP Address on Windows 11
Method | Works Instantly? | Difficulty |
|---|---|---|
1. Use a VPN (e.g., X-VPN) | ✅ | ⭐ |
2. Restart your router | ⚠️ Sometimes | ⭐ |
3. Use a proxy server | ✅ | ⭐⭐ |
4. Switch to a different network | ✅ | ⭐ |
5. Use Tor browser | ✅ | ⭐ Easy, but slow |
6. Contact your ISP | ⚠️ (takes time) | ⭐⭐ |
Want to change the IP address on other devices? Check out our complete guide: How to Change IP Address.
Which IP Address Should You Change: Public or Private?
Before you change your IP address on Windows 11, it’s important to know which type you actually want to change. There are two main types:
Public IP (External)
This is the address the internet and websites see when you go online. Your public IP is given by your internet provider, and you can’t change it directly on your PC. But in the next section, we’ll show you how to change it on Windows 11.
Change your Public IP if you want to:
- Hide your online activity and protect your privacy
- Access sites or apps blocked by region or network
- Remotely access your home or work network
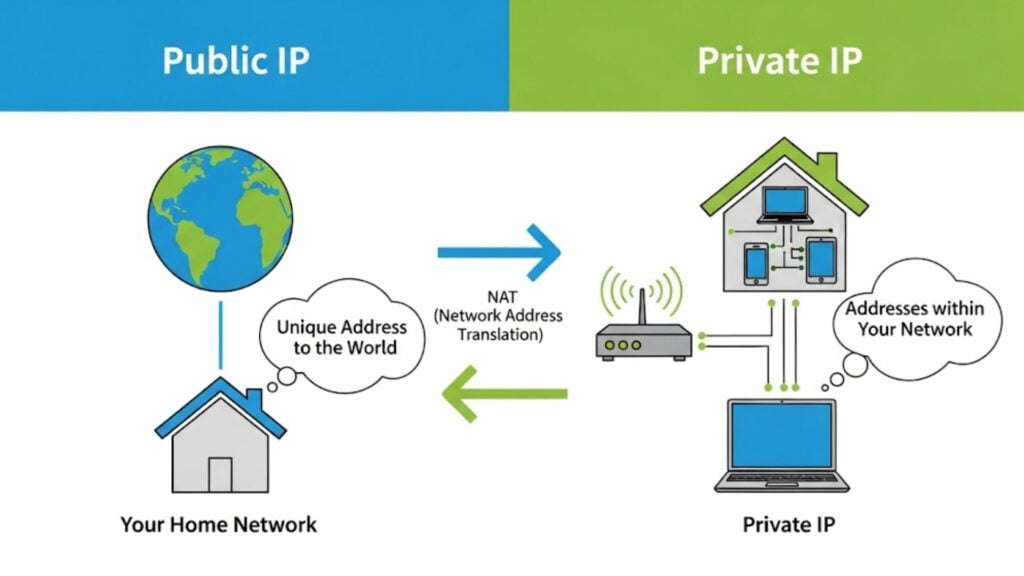
Private IP (Local)
This is the address your device uses on your local network at home, work, or school. Devices use it to connect, share files, and print. You can easily change your private IP in Windows 11 settings or using Command Prompt.
Change your Private IP if you want to:
- Fix local network or device connection problems
- Set a static IP in your LAN (for Remote Desktop, file sharing)
- Avoid IP conflicts on your network
In short, if you want websites to see a different IP, change your public IP. If you just need to fix network problems at home, change your private IP. Since most users care more about their Public IP, next, we’ll show six easy ways to change it on Windows 11.
How to Change IP Address on Windows 11? 6 Easy Ways!
On Windows 11, you can’t directly edit your public IP address in the system settings, since it’s assigned by your ISP through your router. But here’s the good news: with a few simple tricks, you can change the public IP that websites and apps see!
Way 1: Use a VPN (Easiest & Fastest)
Using a VPN is the easiest and most reliable way to change your public IP on Windows 11.
1. Pick and subscribe to a trusted VPN. For example, X-VPN is fast, secure, and offers a completely free version.
2. Download and install X-VPN. Go to the X-VPN Windows download page and download the installer. Double-click the installer and follow the steps.

3. Open X-VPN and choose a server.
- Free users: No account needed. Just click the “Connect” button, and X-VPN will automatically connect you to the best free server.
- Paid users: Log in and you can manually choose from over 8,000 servers in 65 countries, or let X-VPN pick the fastest for you.

4. Wait a few seconds. When you see “VPN is on,” X-VPN is active. Your public IP has changed!

Way 2: Restart Your Router

For most home users, your ISP gives you a dynamic public IP. This means your IP is only “leased” for a period of time, and rebooting your devices can often get you a new one.
1. Find your modem and router. Sometimes they’re combined into one device.
2. Unplug the power cable from your router (and modem, if they’re separate). Wait for 5–10 minutes.
The longer you wait, the more likely your ISP will assign you a new IP.
3. Plug the power back in:
- First, connect the modem and let it fully boot. This usually takes 2–5 minutes until the “Internet” or “Online” light turns solid green or white.
- Then, plug in the router and wait 1–2 minutes until the Wi-Fi light starts flashing normally.
4. Reconnect your computer and use a free online IP address checker to see if your IP has changed.
💡Tip: If your IP didn’t change, try waiting 30 minutes or longer before reconnecting, or use a VPN for instant results.
Way 3: Use a Proxy

A proxy works like a lightweight VPN, but usually only routes your browser traffic (not your entire device). When you connect to a proxy server, your IP address changes to the proxy’s IP.
1. Get proxy server details: Find a free or paid proxy server online. You’ll get an IP address and a port number.
2. Set up the proxy in Windows 11:
- Go to Settings > Network & Internet > Proxy.
- Under “Manual proxy setup,” click “Set up.”
- Turn on “Use a proxy server.”
- Enter the proxy’s IP address and port number you got.
- Click “Save.”
3. Now, your browser will show the proxy’s public IP instead of your real one.
Note
Unlike a VPN, a proxy does not encrypt your connection. For better privacy, it’s recommended to use a VPN for Windows.
Way 4: Switch to a Different Network

Your public IP is tied to your network connection, not your device. This means if you connect to a new Wi-Fi or a mobile hotspot, you’ll get a different public IP.
1. Go to Settings > Network & Internet > Wi-Fi.
2. Disconnect from your current network.
3. Connect to another network, like your phone’s hotspot or a public Wi-Fi at a coffee shop, airport, or library.
Once connected, your IP address should be different.
Way 5: Use the Tor Browser

Tor is similar to a VPN, but it works in a different way. When you use the Tor Browser, your connection bounces through three random servers (called “nodes”) around the world, and each step is encrypted. Websites will only see the IP address of the last Tor node, not your real IP.
1. Go to torproject.org and download the Tor Browser.
2. Install and open it.
3. The first time you launch it, a window will pop up. Just click the “Connect” button.
4. Wait a few seconds (sometimes up to a minute) while Tor connects to its network.
5. Once the browser window opens, you’re connected! Now, whenever you browse with Tor, websites will only see the Tor network’s public IP—not yours.
Note
Tor can be slow because your traffic goes through multiple nodes. Also, some websites may block Tor users or ask for extra verification.
Way 6: Contact Your ISP for a New IP

If none of the above methods work, you can call your ISP’s customer support and ask them to assign you a new public IP address. But this might take some time, or you might wait forever.
1. Get your account info ready: Have your account name, service address, and account number ready.
2. Call customer service: Dial your ISP’s support hotline.
3. Make your request: Clearly explain that you need a new public IP address and why (for example, to fix a network issue or improve security).
4. Follow their instruction. They might:
- Ask you to restart your modem
- Refresh your lease on their end, or assign you a new IP
- Charge a small fee (in some cases)
5. Verify the change: Once done, check your IP online to confirm that it has changed.
Some ISPs only provide static IPs or use CGNAT (shared IPs). In that case, using a VPN is the best solution.
How to Check If Your IP Address Has Changed?
Finished the steps above? Now let’s see if your IP change worked.
1. Make sure you’re connected to the internet.
2. Open any web browser (Chrome, Edge, Firefox, Tor Browser, etc.).
3. Go to an IP checking website, such as:
You can also check the IP location on these sites to confirm it shows the right country or city.
4. Check the result. The site will clearly show an IP address. This is your current public IP address.

5. Compare this address to the one you saw before making changes. If it’s different, your public IP has been successfully changed.
- Using a VPN or proxy? The site should show the VPN/proxy server’s IP.
- Still seeing the old IP? Try reconnecting your VPN/proxy, refreshing the page, or rebooting your router.
Conclusion
How to change IP address Windows 11? As you can see, there are several ways to do it. For most people, using a VPN is the easiest and most reliable solution. With just one click, you can instantly change your IP and take full control of your online identity. Click below to try X-VPN for free and change your IP address in seconds—fast, secure, and super easy for anyone!

FAQs
How do I find my own IP address in Windows 11?
-Public IP: Open any browser and go to xvpn.io/ip-address-checker to see your public IP address.
– Private (local) IP: Press Windows + R, type cmd, and press Enter. Then type ipconfig and press Enter. The IPv4 Address shown is your local IP.
How do I manually change my IP address on Windows 11?
Go to Settings > Network & Internet > Wi-Fi or Ethernet > Properties. Under “IP assignment,” click Edit, select “Manual,” and enter your desired IP address, subnet, and gateway.
How do I force my computer to get a new IP address?
Open Command Prompt as administrator and run the following commands:ipconfig /release
ipconfig /renew
This will ask your router (via DHCP) to assign a new IP to your computer.
Does changing your IP address do anything?
Yes. Changing your public IP can help you hide your online identity, avoid tracking, access geo-blocked content, or reset some site limits.
What does DHCP mean?
DHCP stands for Dynamic Host Configuration Protocol. It’s a network service that automatically assigns IP addresses and related settings to devices on a network.