What Is Split Tunneling?
Want a deeper explanation? Read our full guide about what is Split Tunneling: What It Is, How It Works, and Easy Setup
Have you ever wished some apps could use the VPN while others stayed on your normal internet connection? Or wanted apps like Netflix, TikTok, or ChatGPT to always use a fixed VPN location—even if you switch VPN servers for everything else?
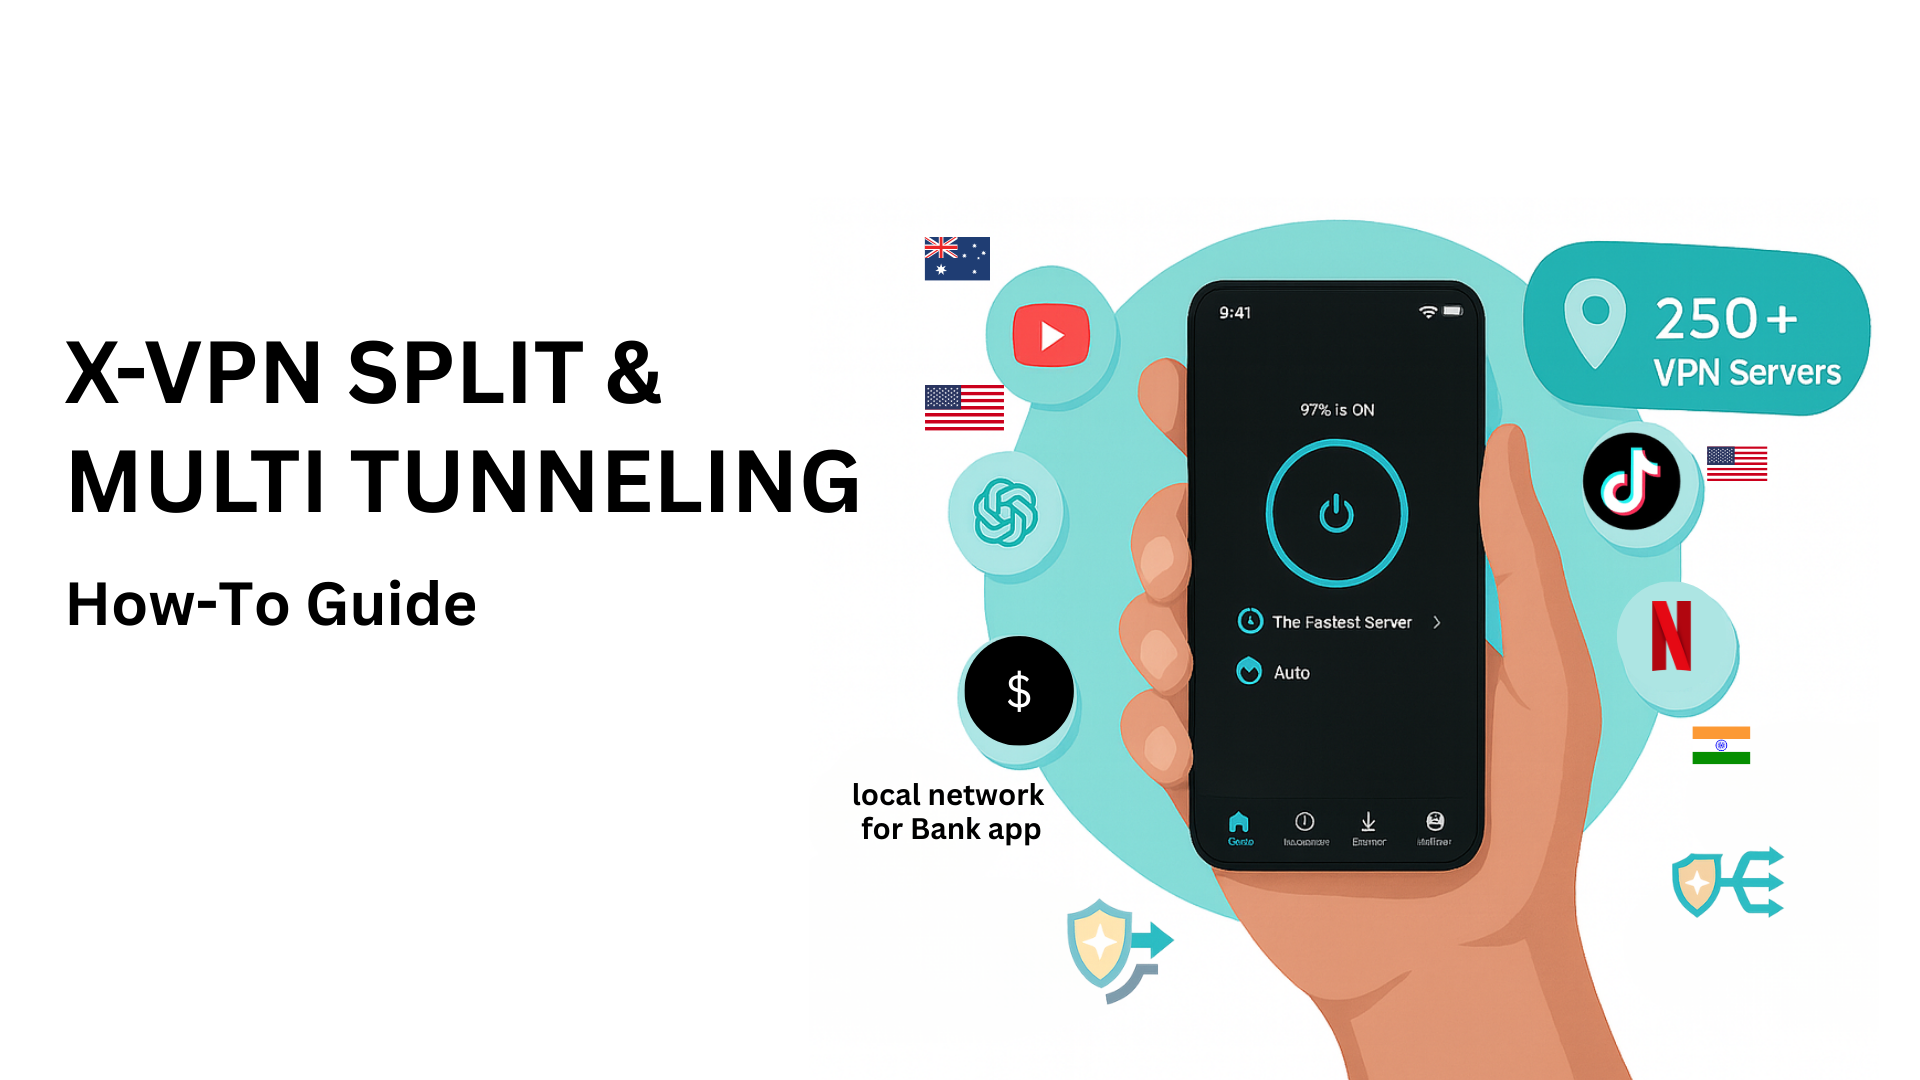
X-VPN makes this simple with X-VPN Smart Routing, powered by two features: X-VPN Split Tunneling and X-VPN Multi Tunneling.
This guide explains how each feature works and shows you exactly how to set them up.
In this guide, we use iOS app screenshots as examples. The screens and buttons are largely the same across all X-VPN versions, including Windows, Android, iOS, and macOS. Download X-VPN on all platform.
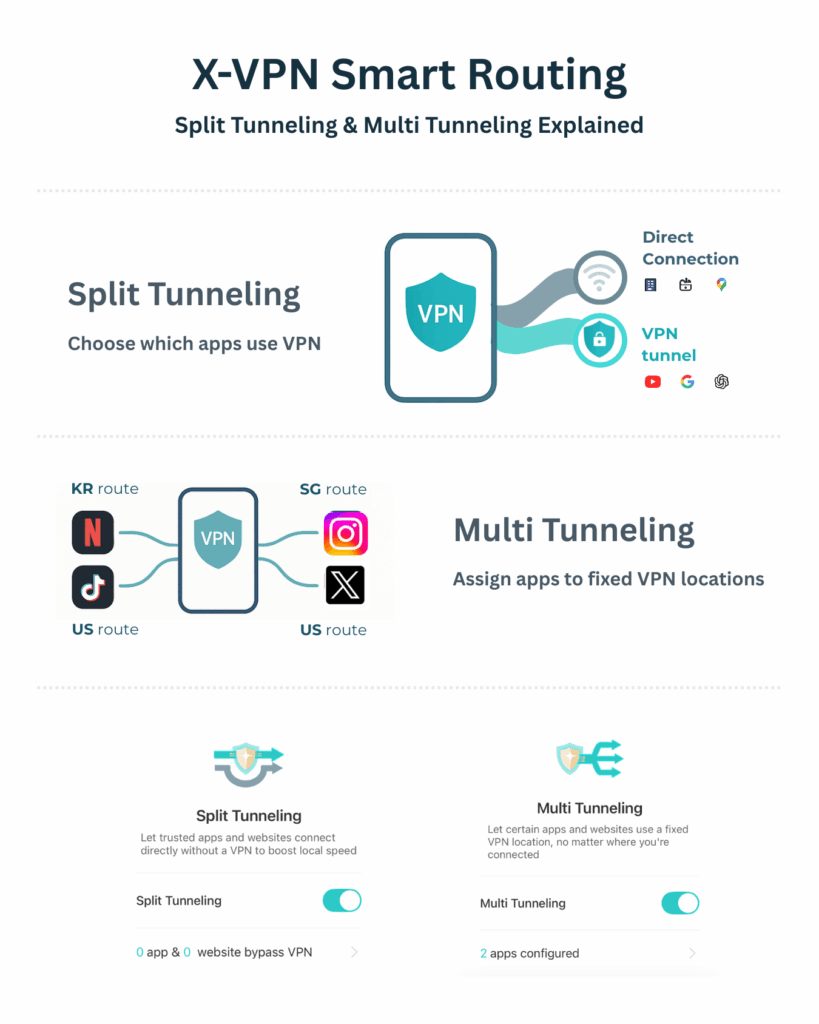
Split Tunneling lets you choose which apps or websites use the VPN and which connect directly to the internet.
Instead of sending all traffic through the VPN, Split Tunneling allows only selected traffic to pass through the encrypted VPN tunnel, while the rest uses your regular internet connection.
This gives you more flexibility without sacrificing performance.
Split Tunneling is ideal when you want:
In short, you decide which traffic needs privacy or location masking—and which doesn’t.

With Split Tunneling enabled, your device separates traffic into two paths:
Via VPN
Traffic is encrypted, your IP is hidden, and region-based access is applied.
Direct Connection
Traffic bypasses the VPN for faster access to local or location-sensitive services.

You can apply these rules to both apps and websites, giving you precise control over your connection.
From the bottom menu, tap Routing to access Split Tunneling and Multi Tunneling options.

Toggle Split Tunneling on to enable the feature.
Tap the arrow to enter detailed configuration.
Select Bypass VPN or Via VPN, then choose which apps or websites should follow that rule.
X-VPN offers two Split Tunneling modes. Each one works differently depending on how you want your traffic routed.

Choose apps or websites that will NOT use the VPN.
All other traffic will automatically go through the VPN when it’s enabled.
Bypass VPN option is Best for:
Choose apps or websites that WILL use the VPN.
Only the selected items will be routed through the VPN. Everything else stays on your local network.
Via VPN Option is Best for:
Under either Bypass VPN or Via VPN, you can configure rules for apps and websites separately.
Go to Select App → All, pick your apps, and tap Save & Return.
Pro Tip: Any time you update your Split Tunneling or Multi Tunneling settings, you must turn on X-VPN (or toggle it off and back on) for the new rules to take effect.

Most of the time, we recommend using Select Preset, which provides a pre-built list of popular websites.
When you tap Select Preset, you’ll see a categorized list of popular websites such as Amazon, BBC, Google, Disney, and more.
Each preset includes all the necessary domain or server entries behind the scenes, making setup fast and easy.
To add a preset:
This option is ideal if you have a long list of domains you want to route through the VPN.
Useful for:
If you have copied a list of domains, just tap Import from clipboard.
All valid entries will be automatically added to your rule list.
Great for:
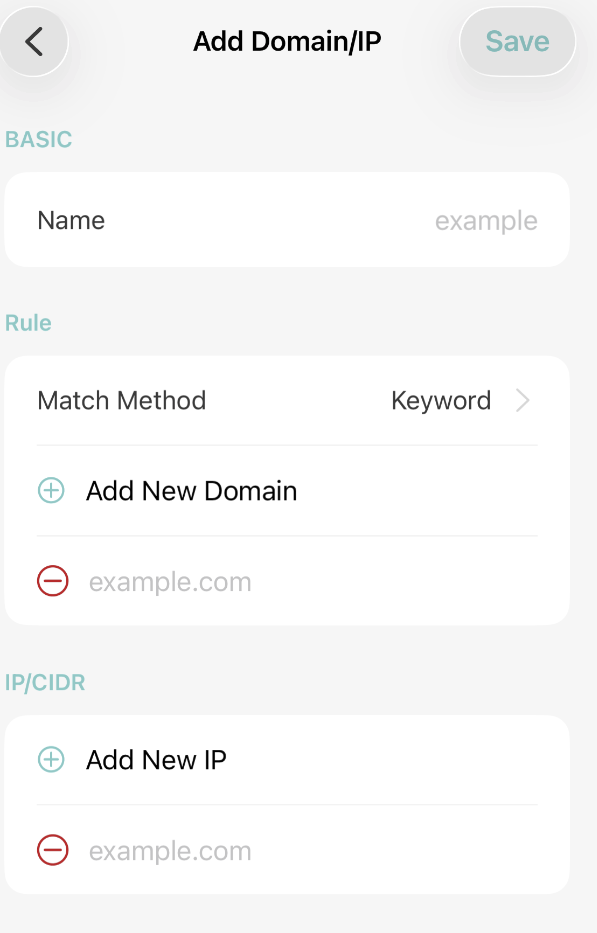
When you tap Add New Rule under Websites via VPN, you’ll see the Add Domain/IP screen. This lets you manually add any website, IP address, or CIDR range you want to route through the VPN.
Here’s how it works:
At the top, you can enter a name to label your rule
(e.g., “Work Site”, “My Game Server”, “Custom Website”).
This is just for your reference.
Under Rule, tap Add New Domain to enter a website such as:
You can add more than one domain to the same rule.
Under IP / CIDR, tap Add New IP to enter:
Use this if the site uses IP-based routing.
After adding all domains and IPs you need, tap Save at the top right.
Your custom rule will now appear in the Websites via VPN list.
After adding or editing rules, turn on X-VPN (or toggle it off/on) for your changes to take effect.
Choose which apps use the VPN and which connect directly.
Multi Tunneling lets you assign a specific VPN location to selected apps, so each app always connects through the same country—even if you switch VPN servers for everything else.
This is ideal for apps that need a stable region to work correctly.
Useful for:
Example:
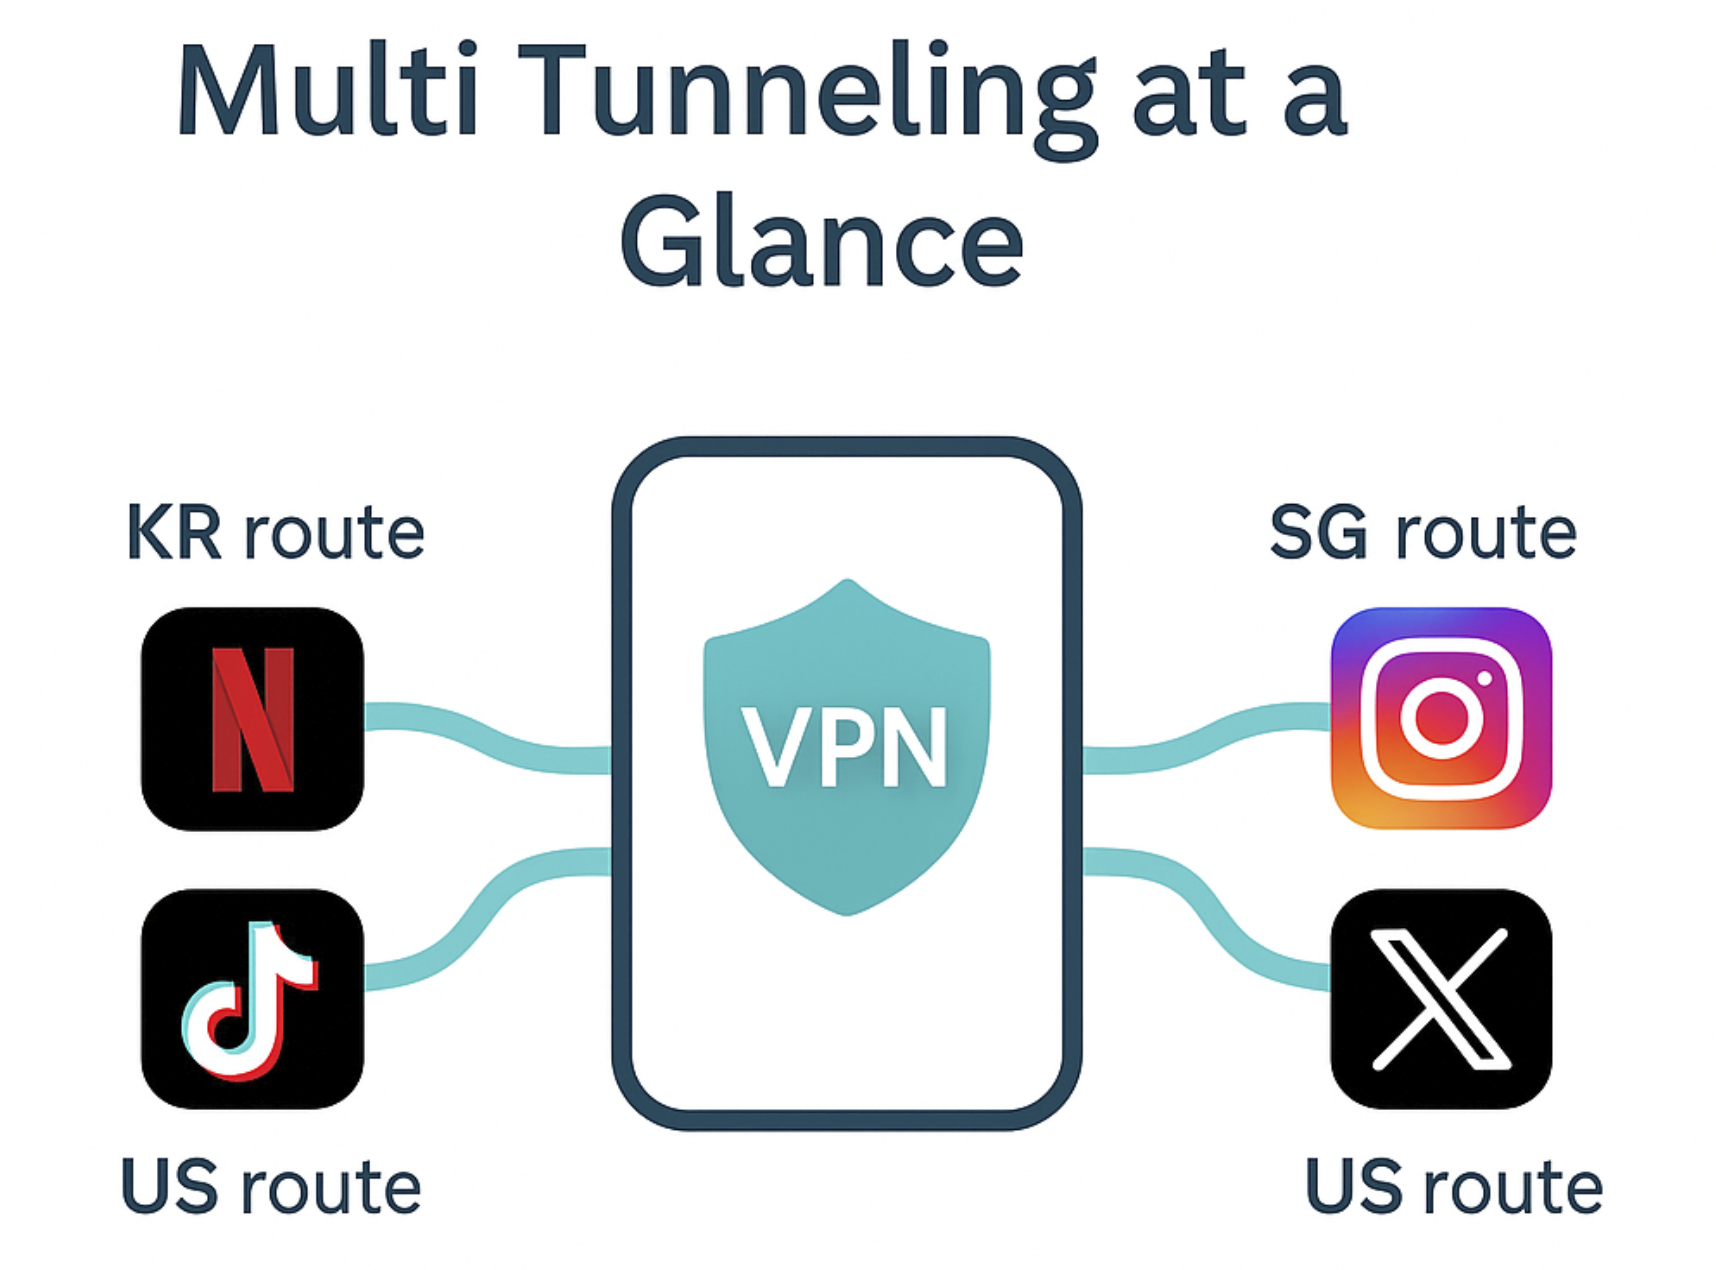
Multi Tunneling allows different apps on the same device to use different VPN locations at the same time.
Each app follows its own fixed route, independent of your main VPN server.
Open X-VPN and go to Routing.
Toggle Multi Tunneling ON to activate the feature.
Once enabled, you’ll see how many apps are currently configured under Multi Tunneling.

Tap the arrow ( > ) next to “X apps configured” under Multi Tunneling to open the Multi Tunneling Config screen.
You’ll see two sections:
From the Supported Product list, tap the Plus (+) button next to an app.
The app will move to the Active list automatically.
Tip: To remove an app from the Active list, tap Edit in the top-right corner, then remove the app you no longer need.
In the Active list, tap the route field ( > ) next to an app
(for example, BR-Video-N).
On the next screen:
The location you choose applies only to that app and won’t affect other apps or your main VPN server.
After adding or editing Multi Tunneling rules, reconnect X-VPN (or toggle it off and back on) for the changes to take effect.
✔ Better local speed
✔ Banking or payment apps to stay local
✔ Only specific apps to use VPN encryption
✔ Apps to always stay in one region
✔ Consistent streaming access
✔ Stable behavior for location-sensitive apps
Both features give you full control — balancing privacy, speed, and convenience.
X-VPN’s new Split Tunneling and Multi Tunneling features make it easier than ever to customize how your internet traffic flows. Whether you want more speed, better streaming access, or smarter privacy, these tools help you tailor your experience exactly the way you want.
If you have questions or want more tutorials, our support team is always here to help.
Ready to take full control of your connection?
Get our X-VPN app and start customizing today.
Customize how your app connects with X-VPN.
Article by
Nate Cipher is a privacy-focused tech writer at xvpn.io, specializing in online security, VPN technologies, and digital privacy education.